

How to draw > Grace Aldrich takes us behind the scenes of the creation of her drawing “Elements of Style.” View sketches, learn what art supplies she used, and find out the unconventional way she checked her progress.
The Process of Creating “Elements of Style”
by Grace Aldrich
No matter what the genre, I believe good art always starts with the end in mind. I like to have an idea of what I’m trying to say or represent before I start. It’s almost like a thesis for an essay, where you have to have a specific topic to follow or else you won’t know what to edit out or how to keep everything orderly. For imaginative or surreal art, I find this to be even more important.
Surrealism is often mistaken as a random jumble of things together, simply for the sake of making something surreal. While I’m sure there are plenty of examples to validate this approach, I believe it can lead to a clichéd or confusing end result. For me, the purpose of surrealism is not to confuse the viewer, but to make them look at life from a new perspective for the sake of drawing new conclusions. Even if the artist’s intent cannot (or should not) be easily discerned, the work should at least allow the impression of the piece to come through clearly.
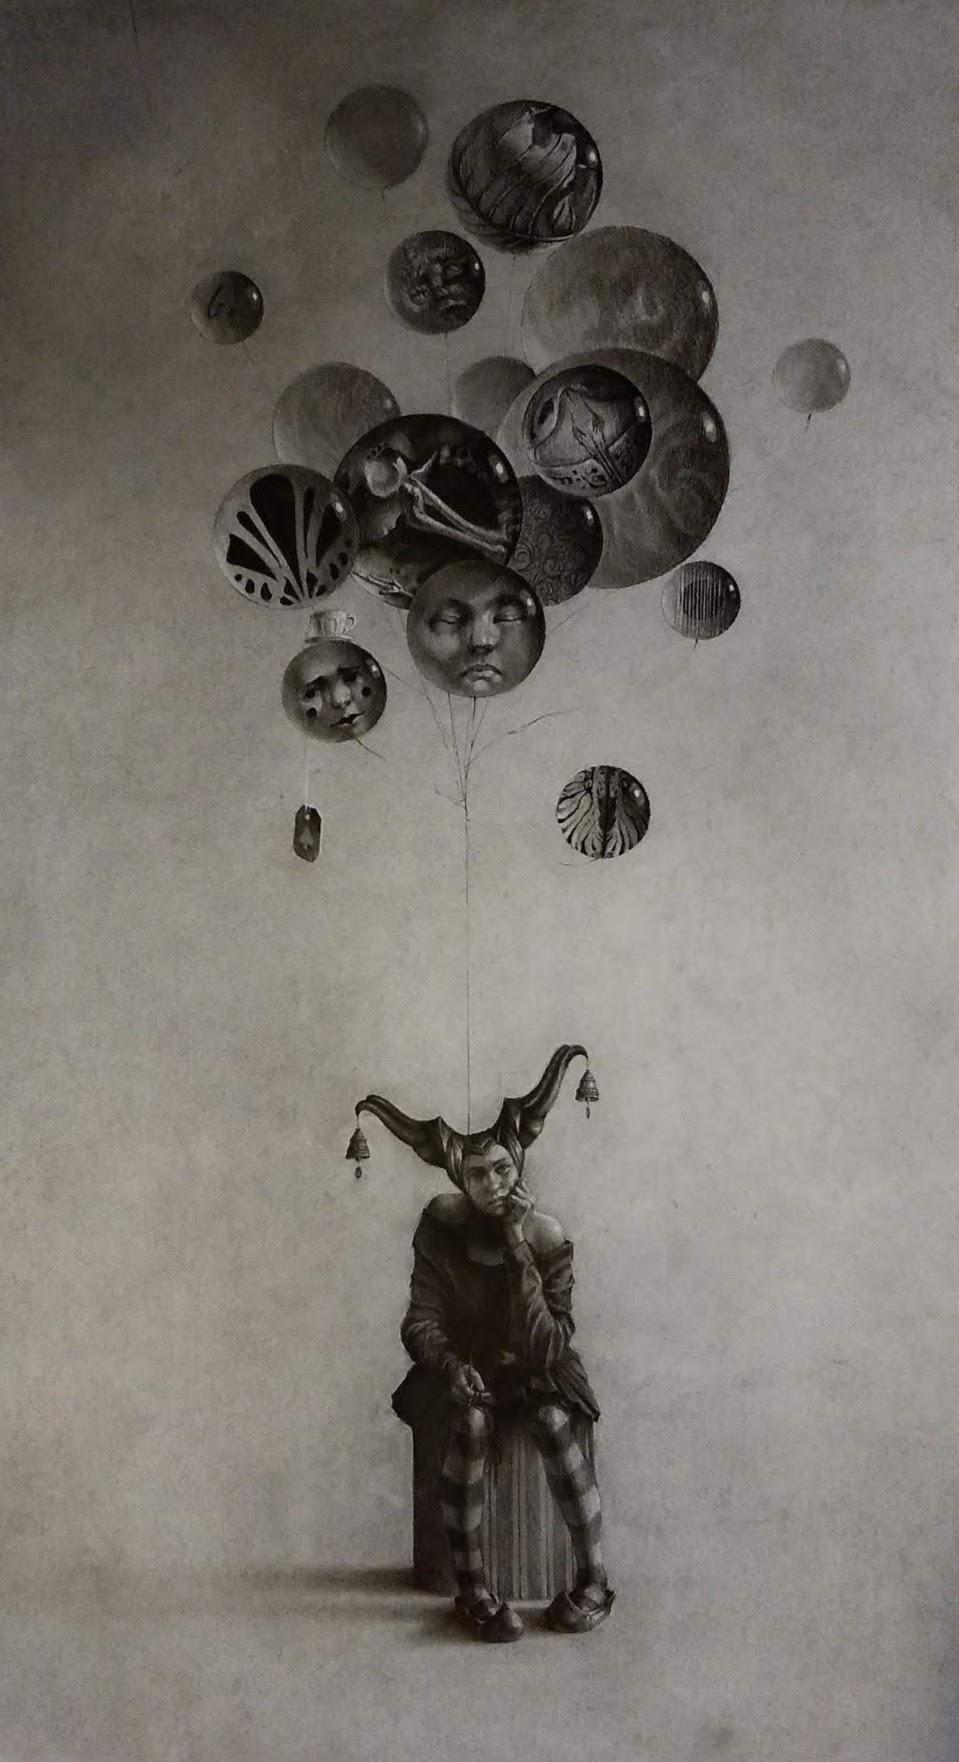
From a technical standpoint, all of my pieces begin with an idea translated into a sketch. The finish of this sketch can range from a detailed and shaded rendering to barely decipherable scribbles with some chicken scratch notes on the side. Thankfully, for this particular piece titled “Elements of Style” I already had a solid idea of what I wanted the final image to look like, and I just needed to find references to allow me to take the piece to the finish I wanted. I contemplated the original idea for this piece about six months before I actually got around to making it. It seems like the old ideas that still beg to be created even after months or years of waiting are always the best and most meaningful to me.
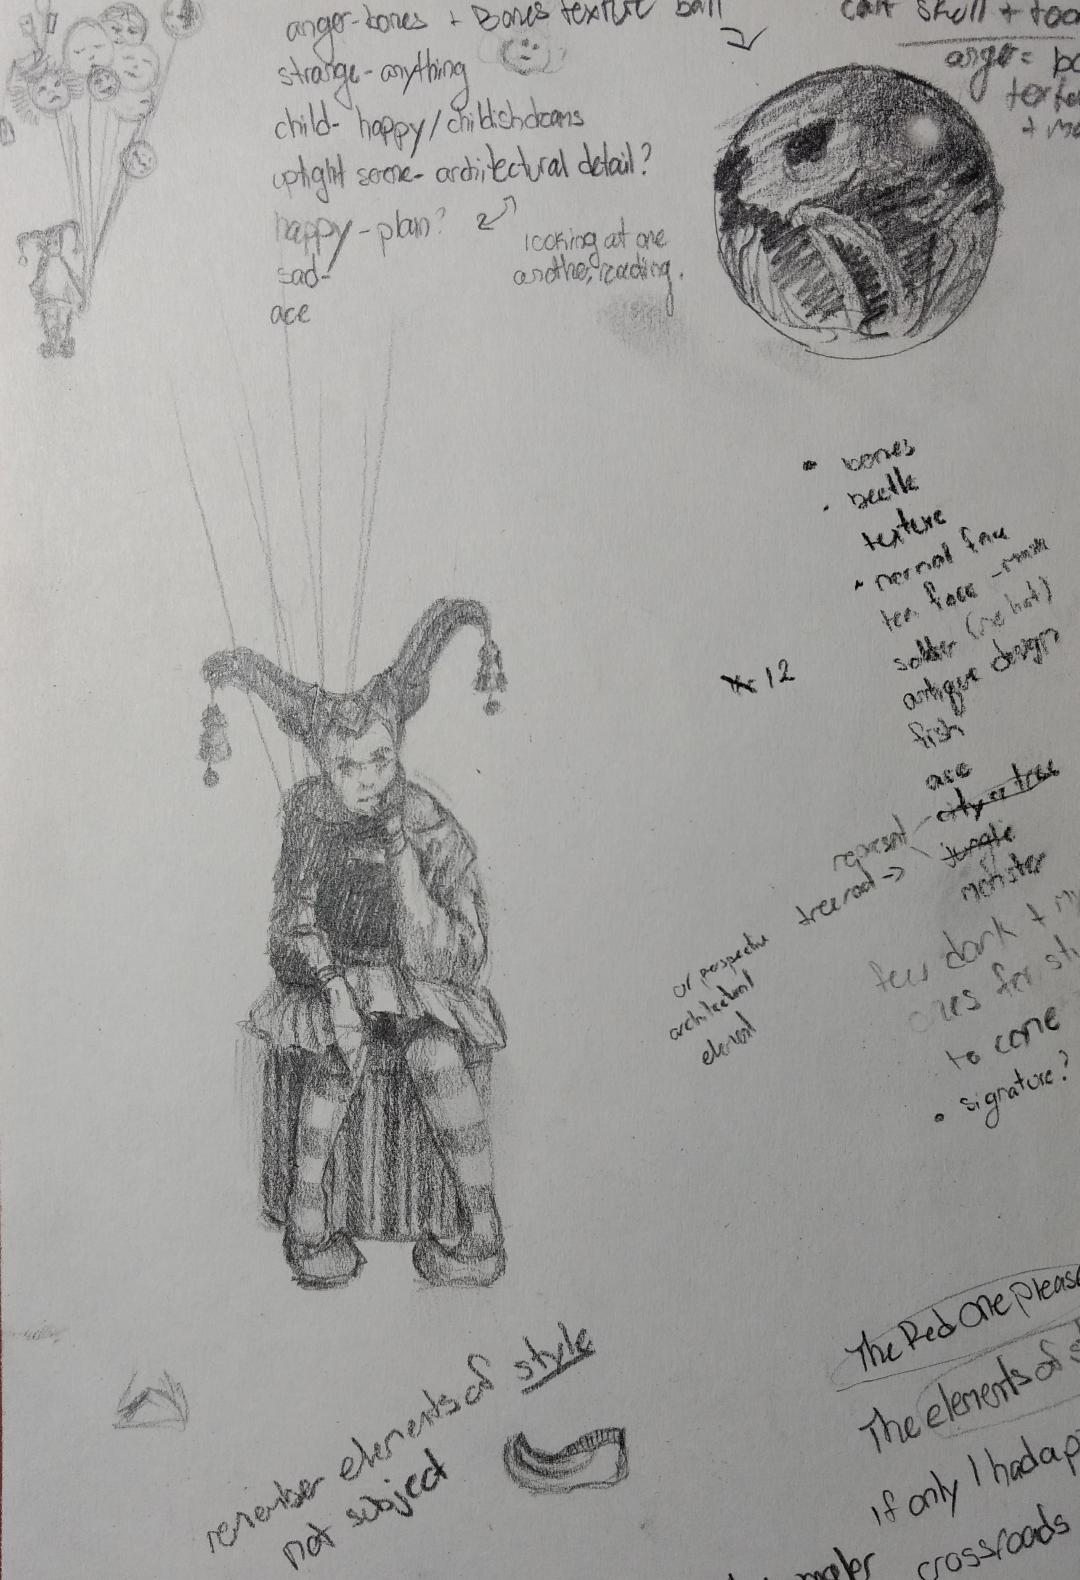
Once I decide to start a piece, I allow myself two or three days to find references, create value and color studies, make practice sketches, and do any other preparatory work that I think will help me when trying to figure out the details later. For this piece I dug up some old sketches I had done, trying to envision what the glass balloons would look like.
They are very basic and messy, but the point of sketches like this is not that they can be interpreted or appreciated by others as great works of art, but that I can look at them later and know exactly what I was thinking at that time, and the specific feelings that need to come across in the final work. A few short notes always help to jog my memory as well.
Having the initial sketch for the costume of the character and a basic idea of the subjects inside the glass balls, it was time to find photo references. I like to take reference photos myself whenever possible. It allows me to set up the lighting how I want and allows me to understand potentially confusing parts of a photograph. By understanding my idea in a photograph, it’s easier to know what I can exaggerate or leave out in order to improve the composition.
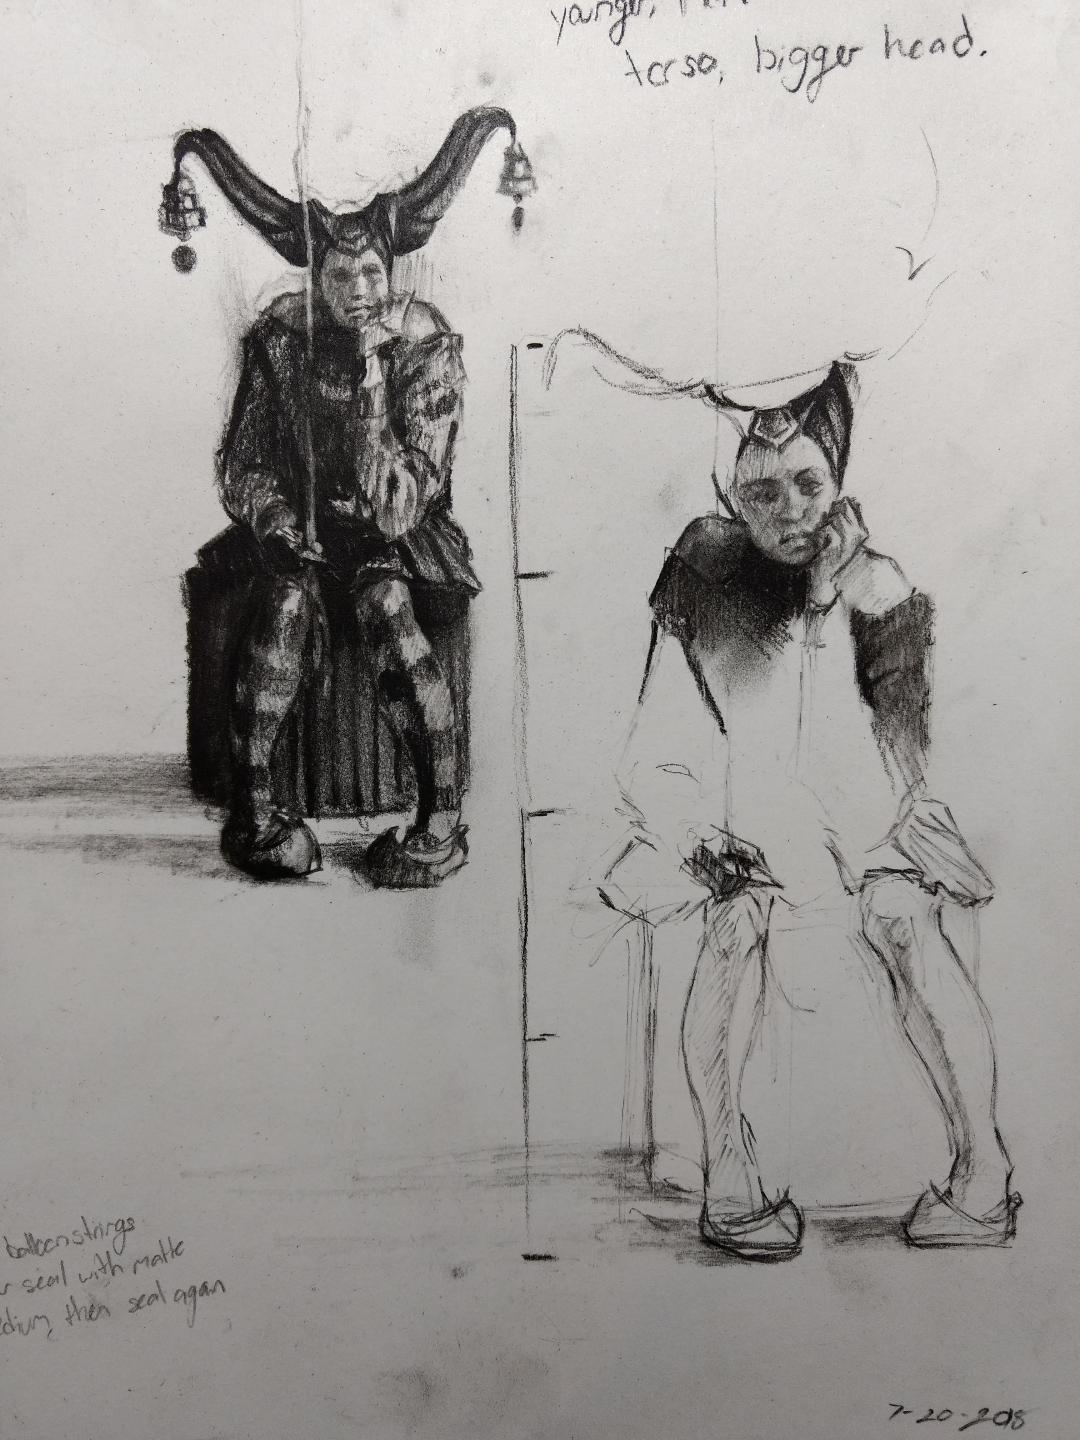
I started by enlisting the assistance of my sister to pose for the girl, but the photos just weren’t turning out right. After a very long photo session, I ended up with only one unusable photo, which I ended up deleting. It was frustrating, but fortunately one of my other relatives was kind enough to sit for me long enough for me to eventually get several good pictures. In addition to the full figure photographs I took, I also took some face shots of myself to help construct the character’s face in the way I wanted. I also ended up needing reference photos of a frog skeleton, a calf skull, a leaf, human anatomy, and folds of the fabric. The skeletons and leaf were quickly photographed from my shelf of references.
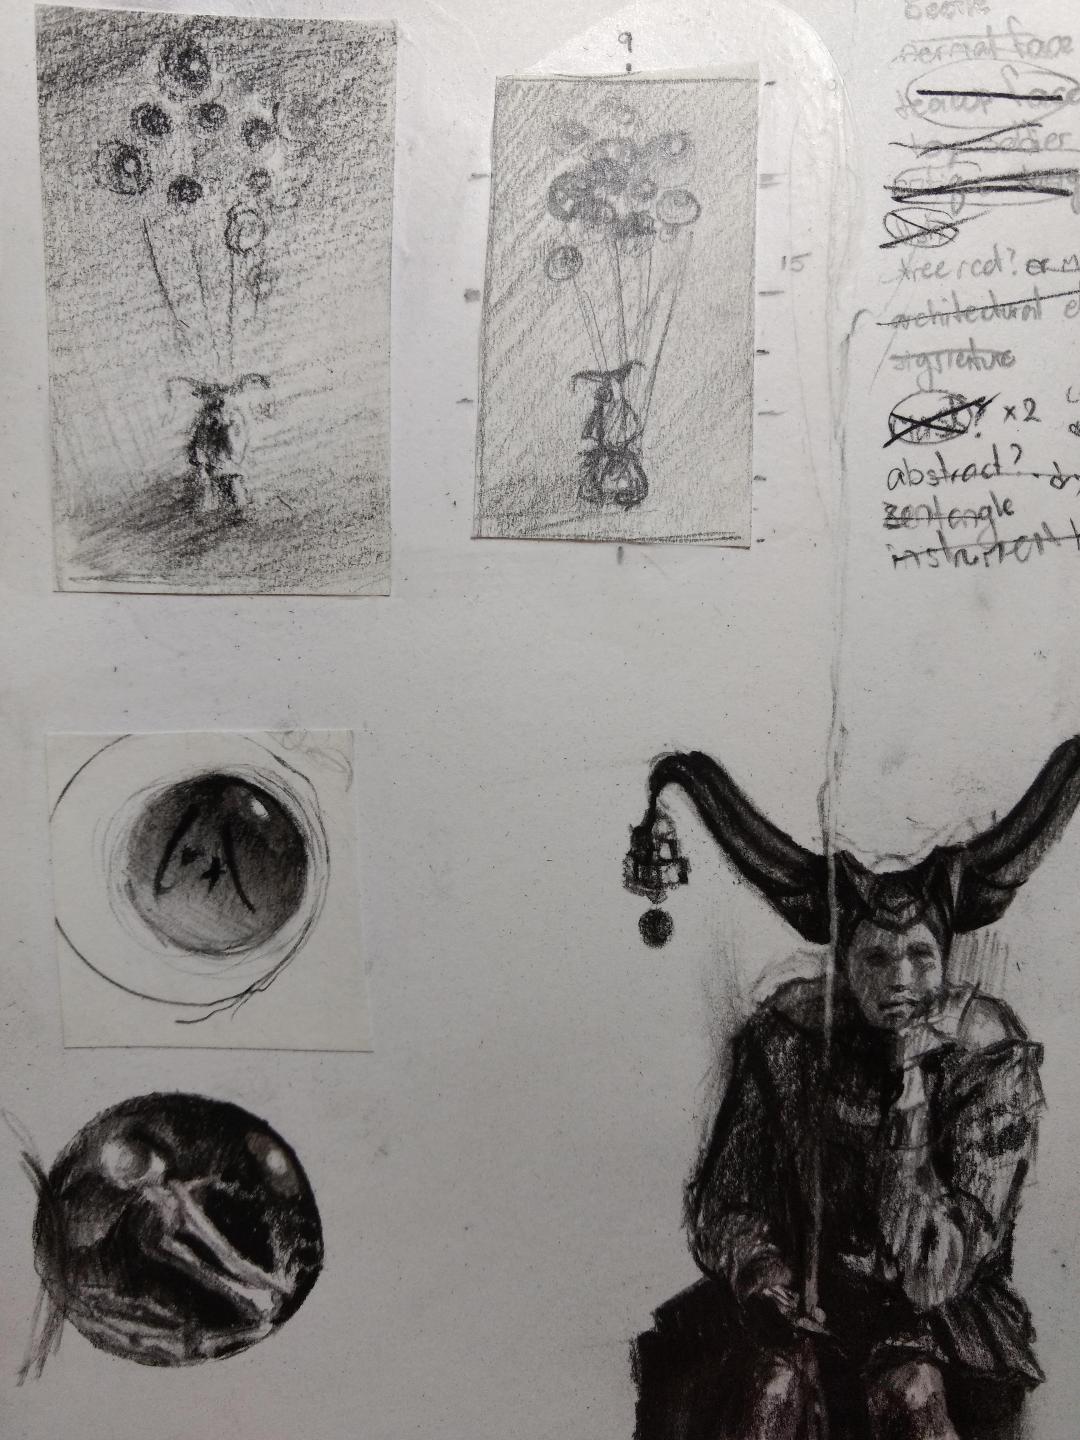
After gathering all of my reference materials I did some more detailed sketches to figure out the look of the main elements of the piece using the photographs I had taken. I did a few versions of the main character just to figure out subtle elements before I started on the final image. While I do often make several studies for a piece, I never like to take them to full completion. I have found that if I render a subject too many times I lose the energy of my sketches by the time I get to the final piece. I also sketched out very basic value and lighting sketches in the upper left corner of the sketch page shown.
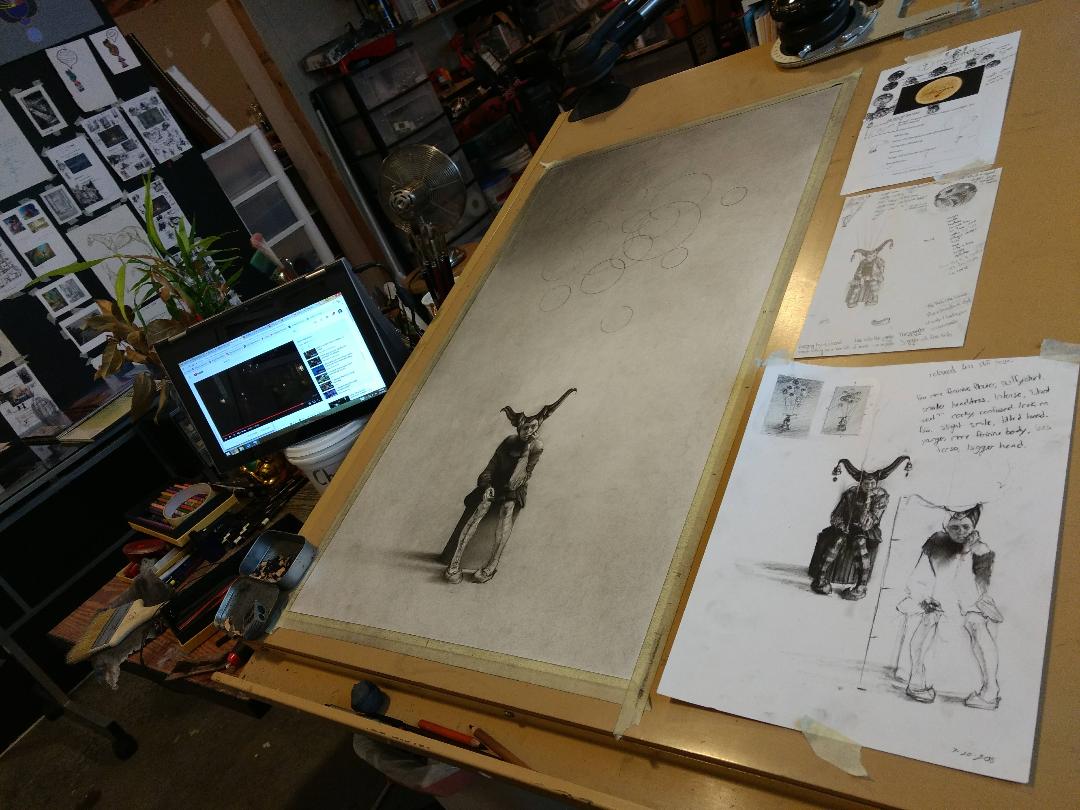
To start the final piece I toned a 30 x 20–inch piece of Strathmore illustration board with an even tone of gray using General’s vine charcoal, blending with my fingers at first, then very gently with a cotton cloth. I found that the cloth blended the charcoal much more smoothly. The trick is to gently rub the surface in circular motions, slowly adding pressure as you go. Not pressing the surface too hard at first prevents any charcoal from being scratched into the surface of the paper before it has a chance to blend.
Using my value sketch as my reference, I then worked back into the paper, adding soft darks to the top and bottom, using the same cotton cloth. I found out the hard way that a clean cloth will strip the paper of charcoal rather than blend it, while a dirty cloth will also slightly burnish the charcoal, making sure it won’t lift up later if you rest your hand on the paper. When I was finished, I brushed off the excess charcoal with a soft brush. This final brushing also added an extra level of smoothness to the tone I had laid down.
Being careful not to lift up the vine charcoal with my palm, I sketched the outlines of the girl, the box, and balloons using a General’s hard charcoal pencil and a Nitram hard vine charcoal. I would like to say that the circles were done freehand, but I cheated and used anything circular in my studio within arm’s reach. This included paint bottles, old glass jars, a tea tin, a lead sharpener, and the inside ring of my masking tape.
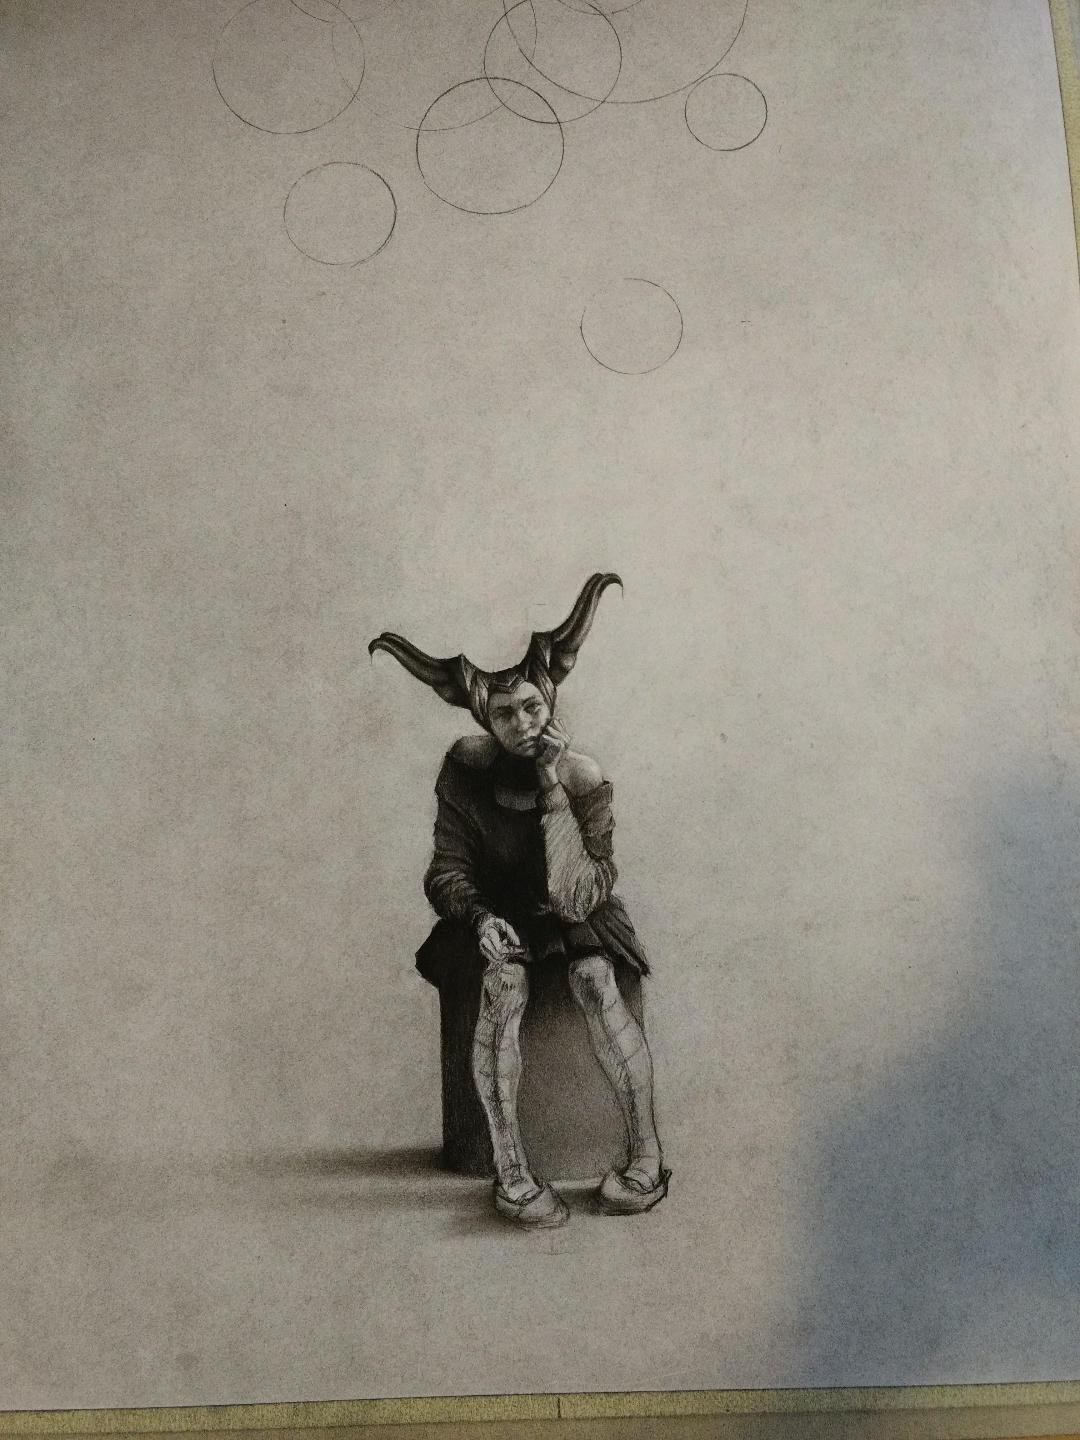
Once the planning was complete, it was time to just sit down, look at my references, and render away. Rendering is my favorite part of drawing because it is simply the most fun. I find it so easy to get caught up in small details rather than the piece as a whole. I always like to step back from my drawing every hour or so to make sure everything looks right.
Funny side note: I had recently rearranged my studio while working on this piece and I discovered that I failed to leave myself enough space behind my drawing table to step back far enough to get a proper view, so I ended up pushing my drafting chair against the wall and standing on it for the right amount of distance needed to review my work.
I also sometimes use the tried and true method of checking my drawings and paintings in a mirror, giving my eyes a fresh perspective that can often reveal any obvious mistakes. Or, I have found that the black screen of my phone works just fine as well.
I started detailing the girl first. Beginning with her face, I added basic shadows, saving the lights and extreme darks for last. Saving the extreme tones allowed me to adjust anything I needed before fully committing. I try to apply my charcoal fairly smoothly, but I do use a tortillon and two synthetic flat paint brushes to blend and smear the charcoal almost like paint when I need to. When using graphite, I prefer not to blend it at all, as it turns shiny and fake-looking, but the charcoal holds its texture very well even when blended.
I work section by section. I don’t like jumping around leaving multiple tasks unfinished, so I divide everything into shapes and work on them individually, making sure that they work together as a whole. To unify all the shapes and values contrasted against one another in a way that wasn’t overwhelming, I allowed much of the detail to melt into shadow, only permitting what I wanted to be carved out against the other shapes.
Because this piece was lit by a diffused light source, I also decided to lose the contact shadows between objects in their cast shadows on the floor. It added to the diffused light effect and also cut down on unnecessary information that can easily clutter a piece. If it’s not essential or doesn’t add to the story, I don’t include it.
When it came time to fill in the glass bubbles, I had to remember how clear substances reflect and diffuse light. In transparent substances like water and glass, light passes through the substance from the direction of the light source to the other side. This leaves a dark area around a highlight on the side facing the light source and a softer light effect on the opposite side. Knowing this principle allowed me to embellish it slightly to make the balloons appear filled.
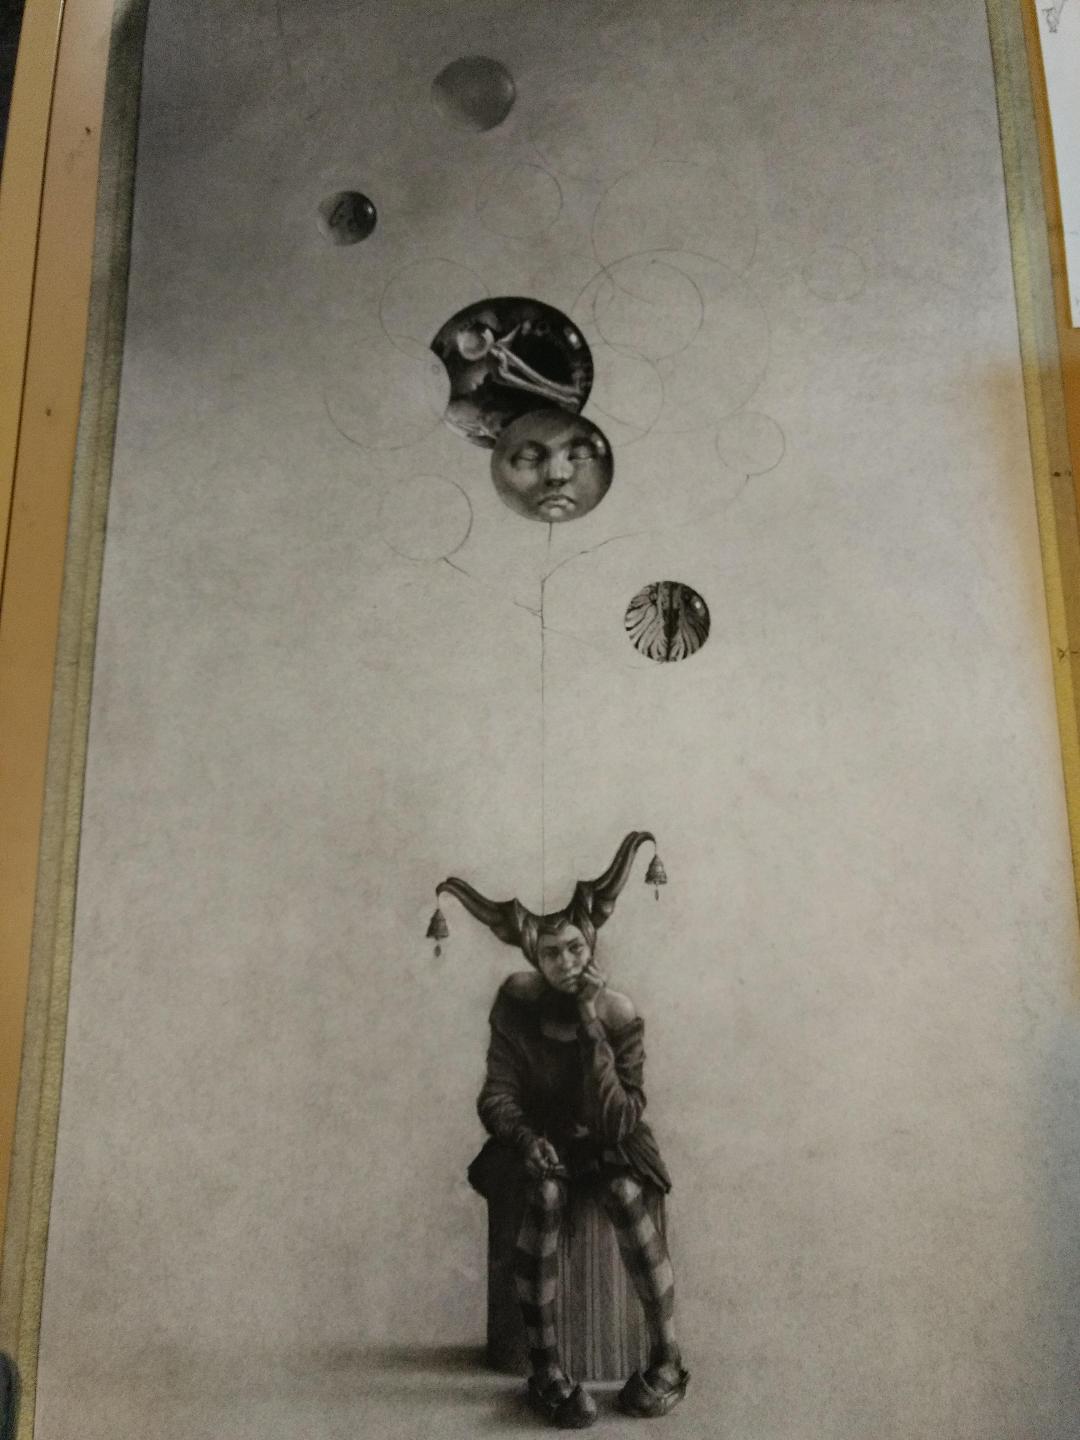
I always like to leave a little room in my pieces for my train of thought. I allow myself to add little details or extra embellishments and characters as long as it doesn’t distract from or oppose the main idea. Here I decided to add a tea bag tag with an ace of spades on the shadow side. I took a very poor last minute reference photo, but it did its job and I liked the end result.

Normally I would sign a piece as soon as it is finished, but in this case I had done my signature inside one of the glass balls fairly early on in the process. I hid my signature this way because I felt any writing on the lower right corner would harm the composition of the piece and attract the viewer’s attention away from my subject I had just spent so much time rendering. Besides, I think it’s fun to try and incorporate my signature into strange places in my pieces. Once the piece was finished I sealed the entire thing with a 1:1 mixture of fluid matte medium and water through an airbrush. After it was sealed, I matted and framed the completed piece and it was ready to be dropped off at the gallery.

I really enjoyed the process of making this piece, and I’m happy with how it turned out. I hope this has been helpful and has inspired you in one way or another to go out and create!
About the Artist: Grace Aldrich is represented by the Rice Gallery of Fine Art in Overland Park, KS (Kansas City area). Works by Grace can be viewed and purchased at www.thericegallery.com.
Grace also often posts photos of her creative process as well as her many sketches, drawings, and paintings on Instagram at @gracealdrichart.
 Learn how to draw portraits with the art video workshop “Drawing the Head in Charcoal” by Zhaoming Wu. Wu is a consummate draftsman who uses the charcoal medium in many different ways to create works that have distinctive looks.


[…] Related > See how the drawing “Elements of Style” came to be in Aldrich’s guest blog post, “From an Idea, To a Sketch, To a Work of Art” […]
Your list of items used for circles resonated with me. I have an entire binder of circles from graphic arts classes and I STILL end up using a thread spool, a baby-food jar lid and a coffee cup…
Comments are closed.