


What if you had to pay for every line you drew? Learn how to use “Penny Lines” and “Dollar Lines” to give each mark a hierarchy of importance in your next figure drawing.
BY TERRY MIURA
The concept of the economy of line is a familiar one to anyone who has studied figure drawing. Basically, it means that we should strive to draw efficiently by using fewer lines to say what we need to say, rather than a lot of unnecessary lines that lack a sense of intent.
In my own drawing, I try to be as efficient as possible by packing a lot of information and intent in each line, and I encourage my students to do the same. After all, what would be the point of drawing five lines to define a muscle, if I can do it in one? It’s like verbal communication; if you can make a clear statement using fewer, well-chosen words, that’s preferable to rambling on and on to get the same idea across.
In an attempt to demystify the process and achieve economy of line, I’ve identified various functions that lines must perform, and sorted them into two categories.
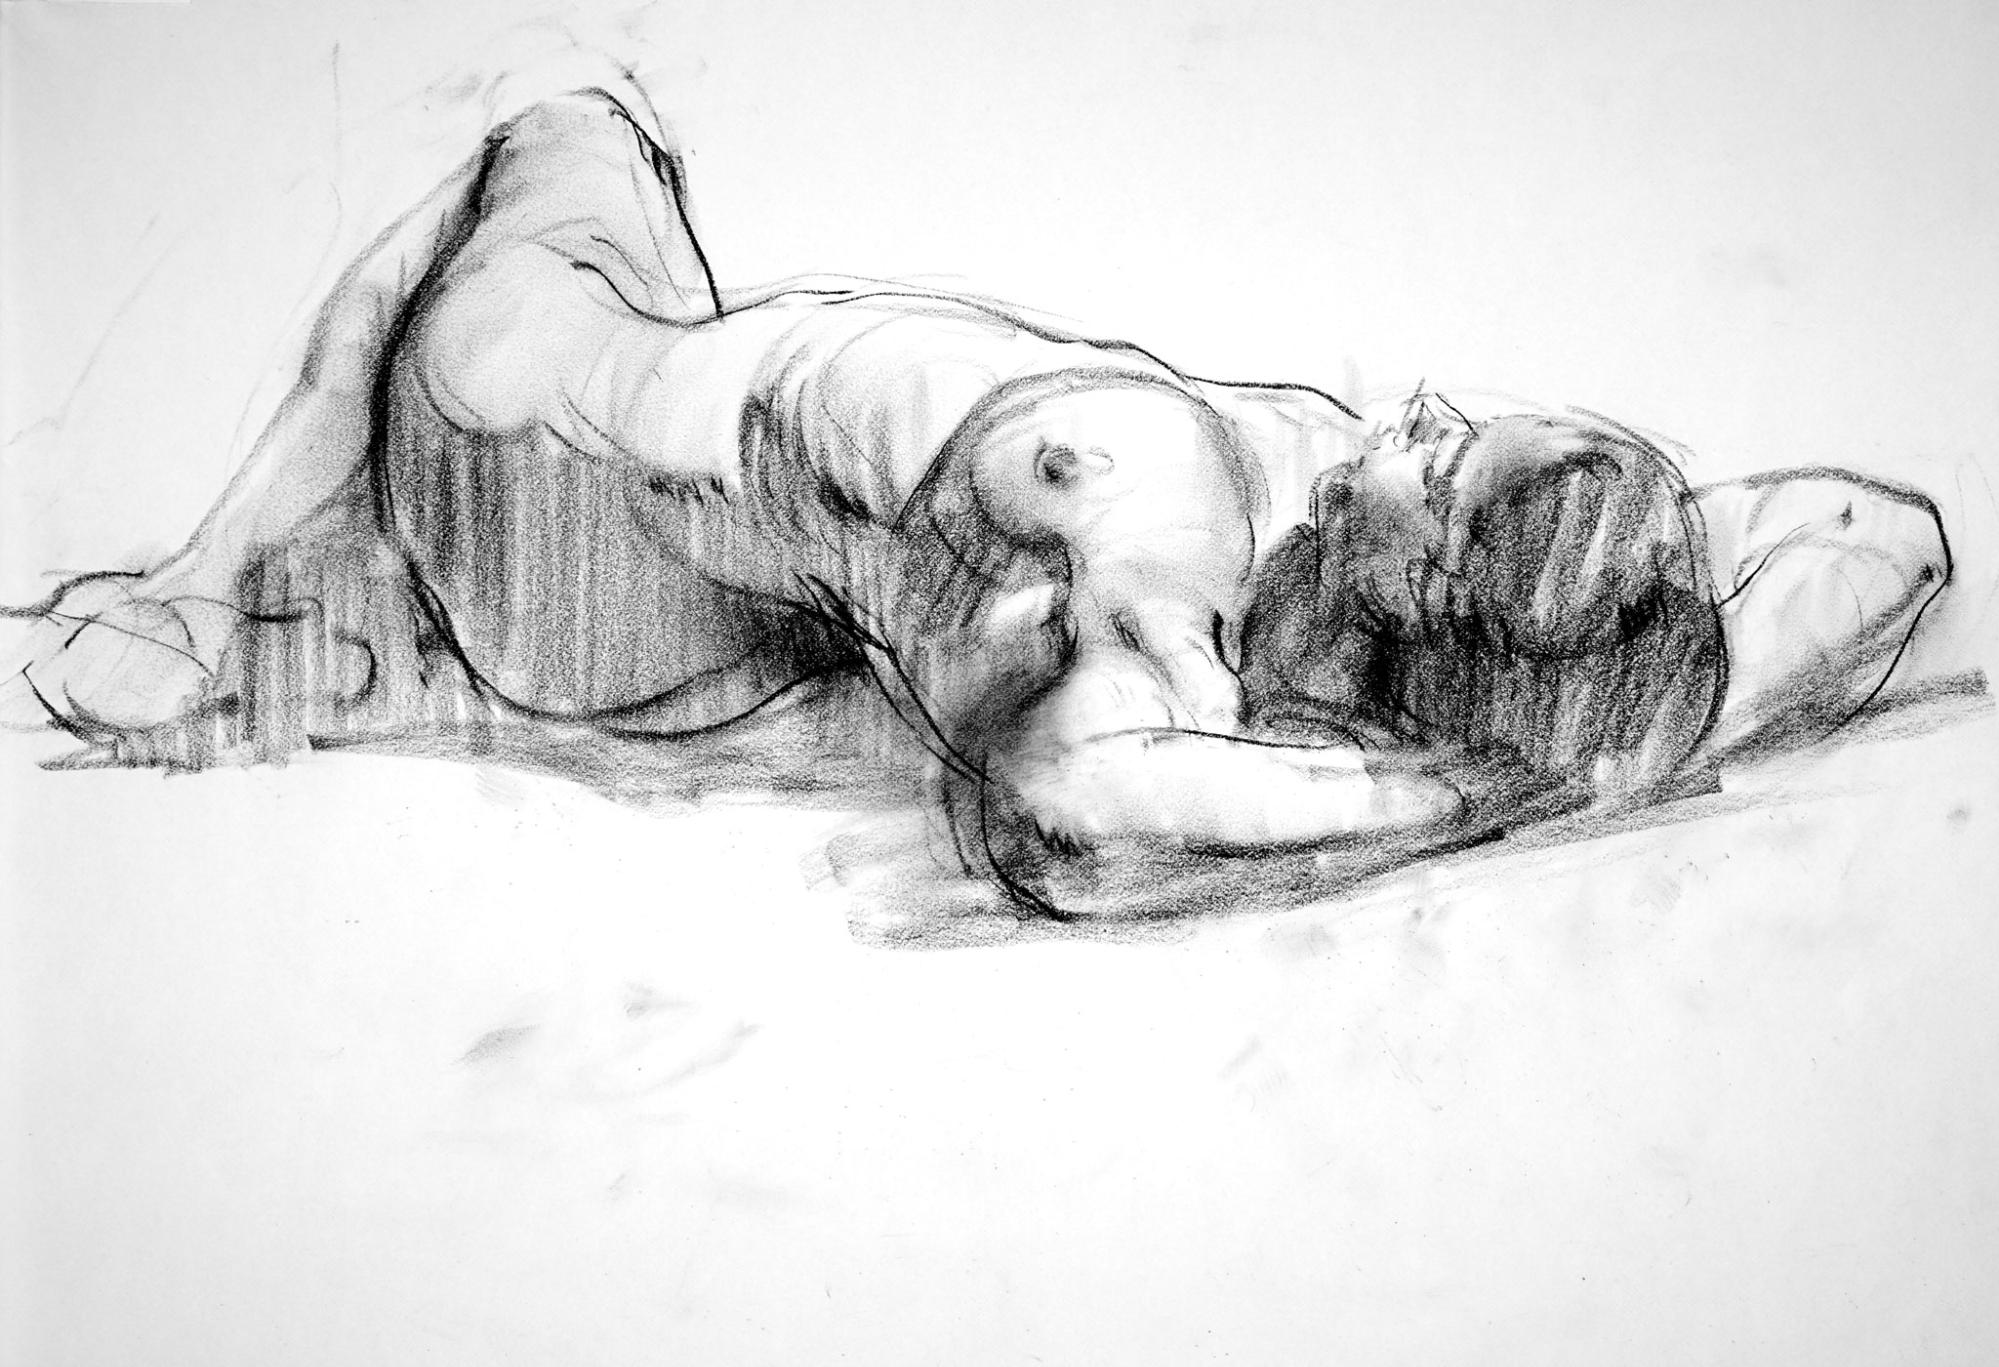
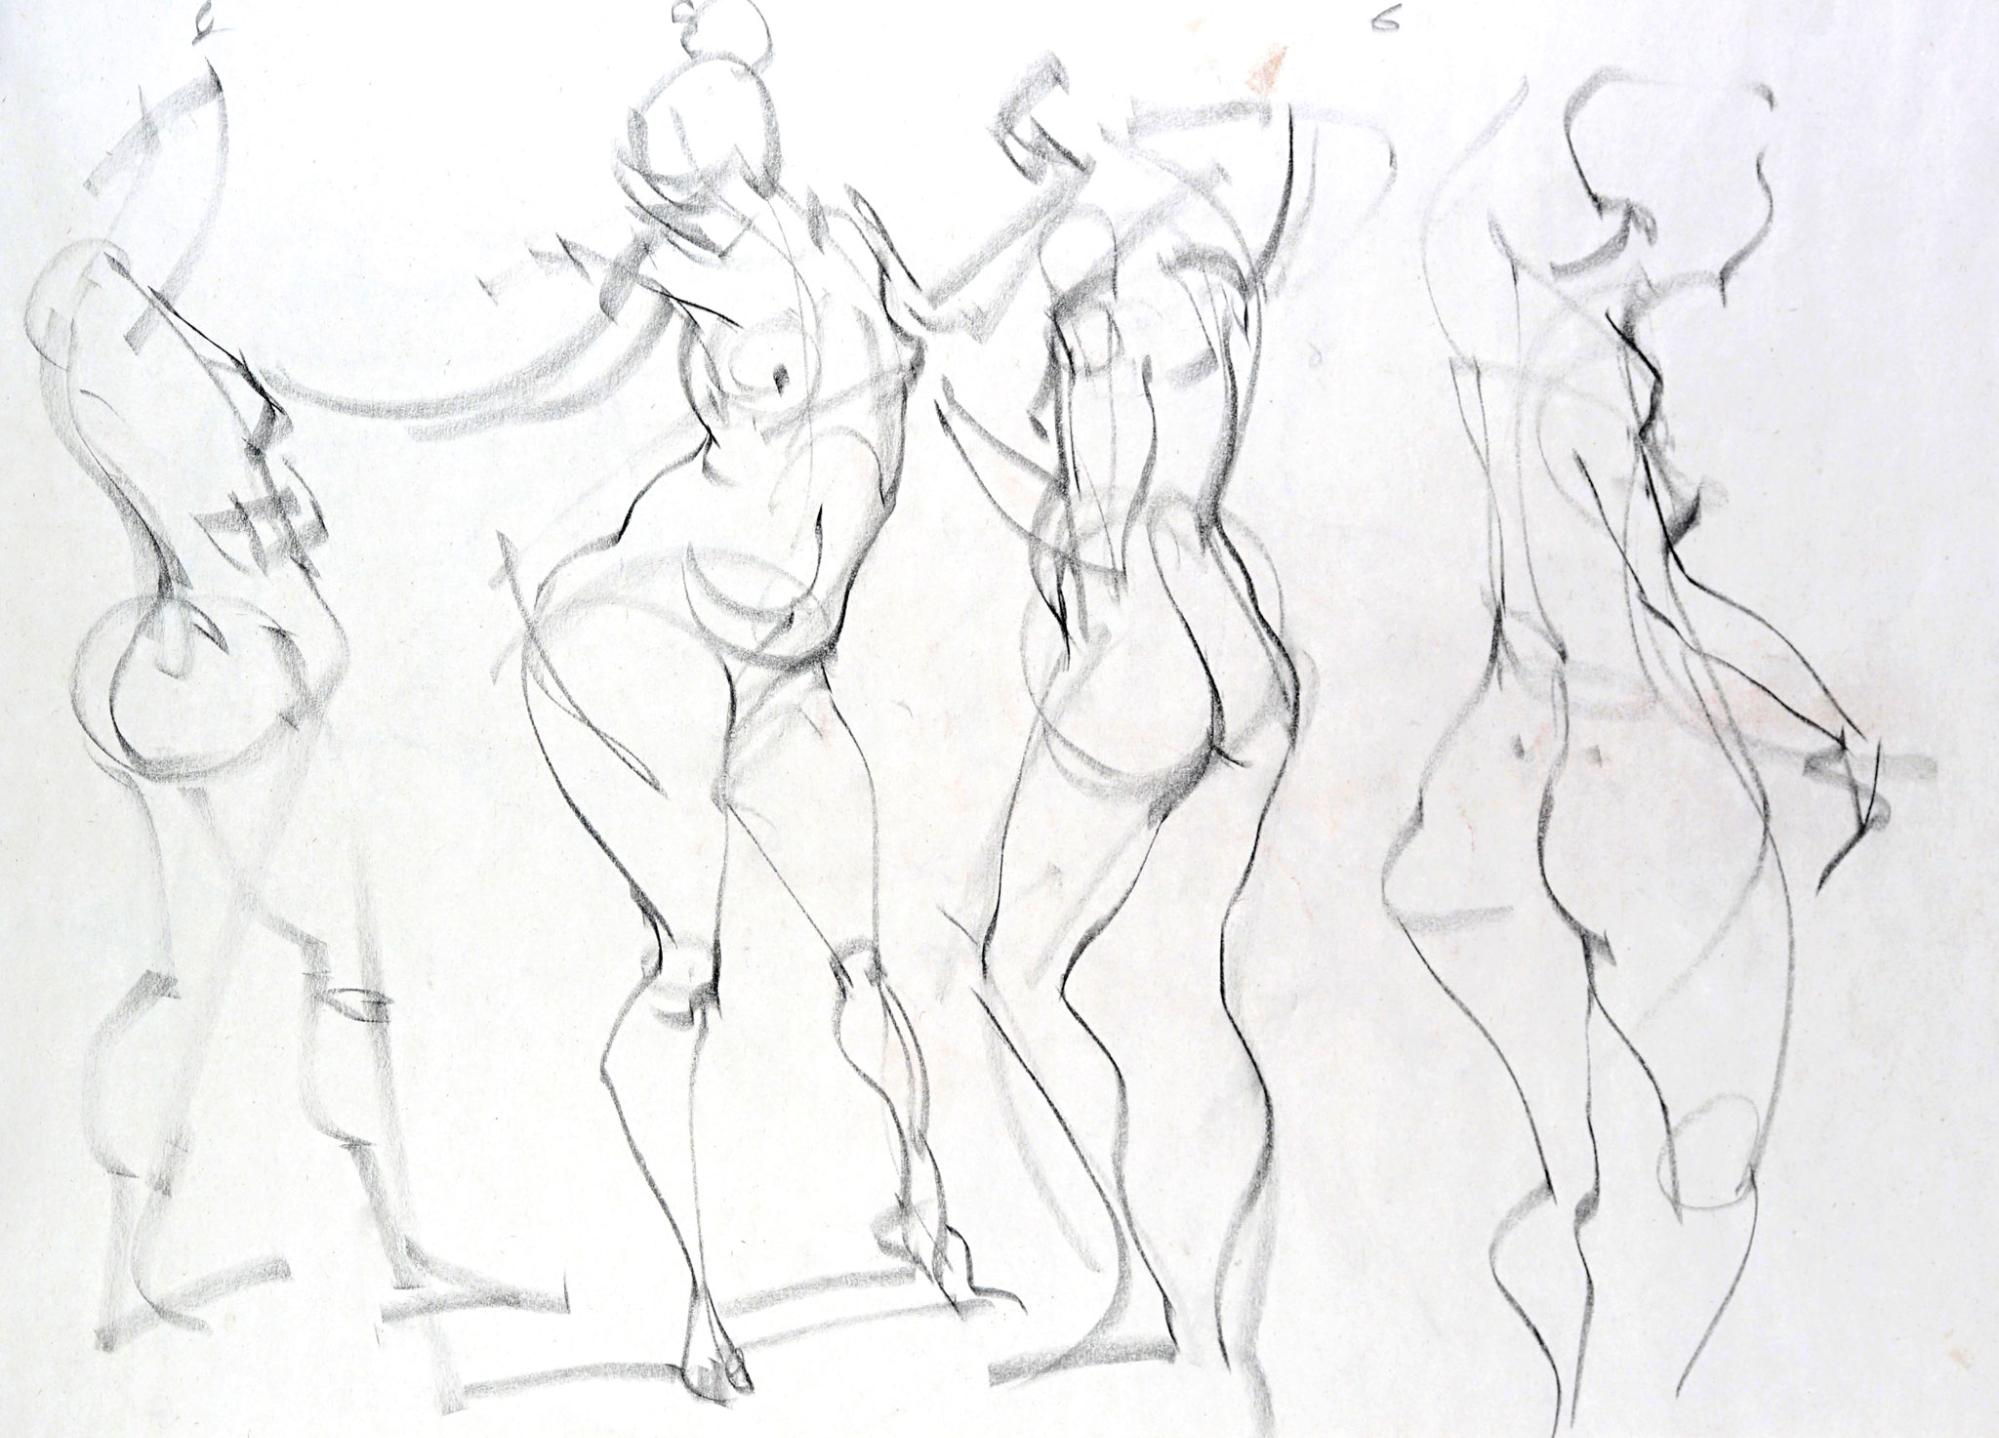
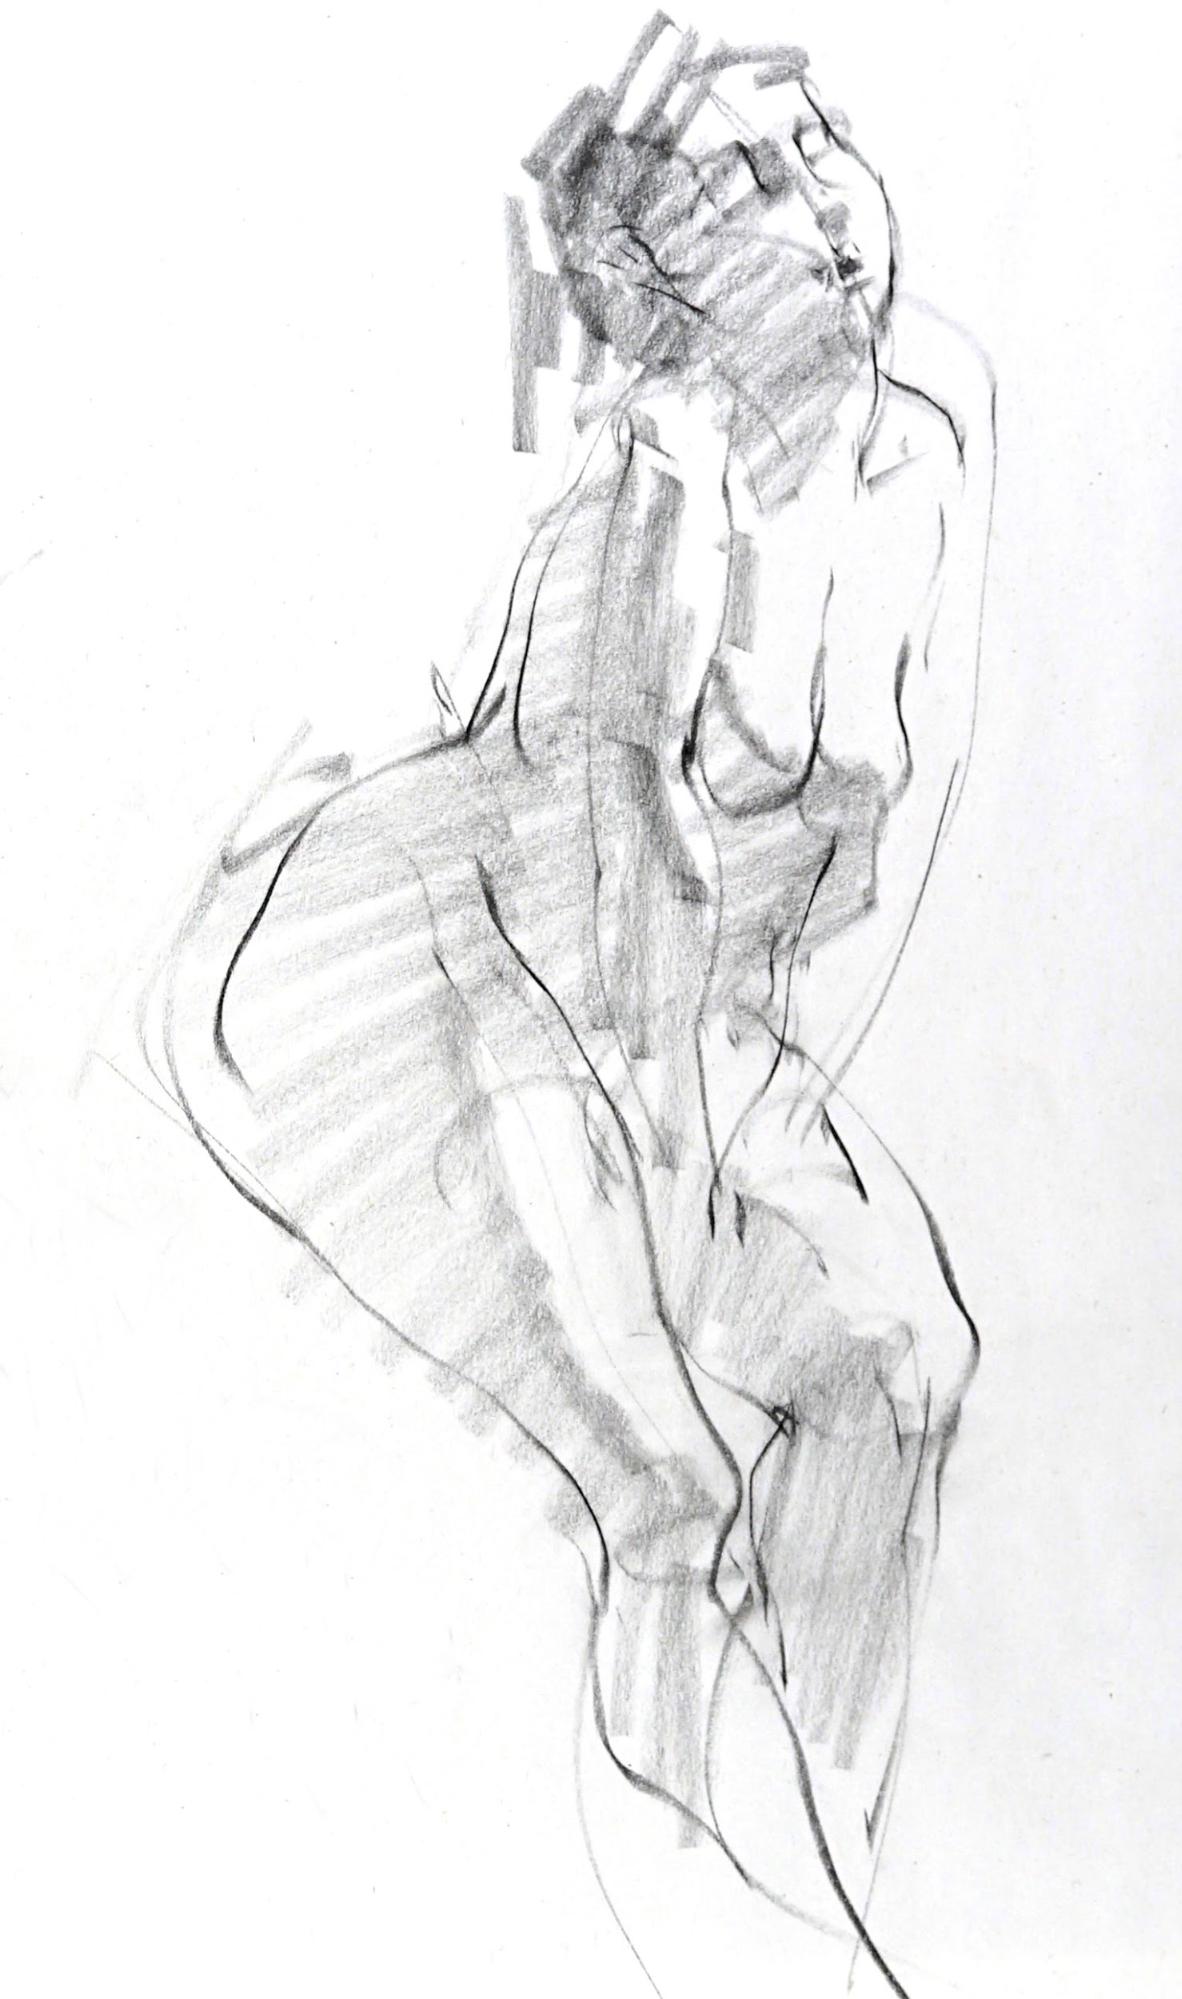
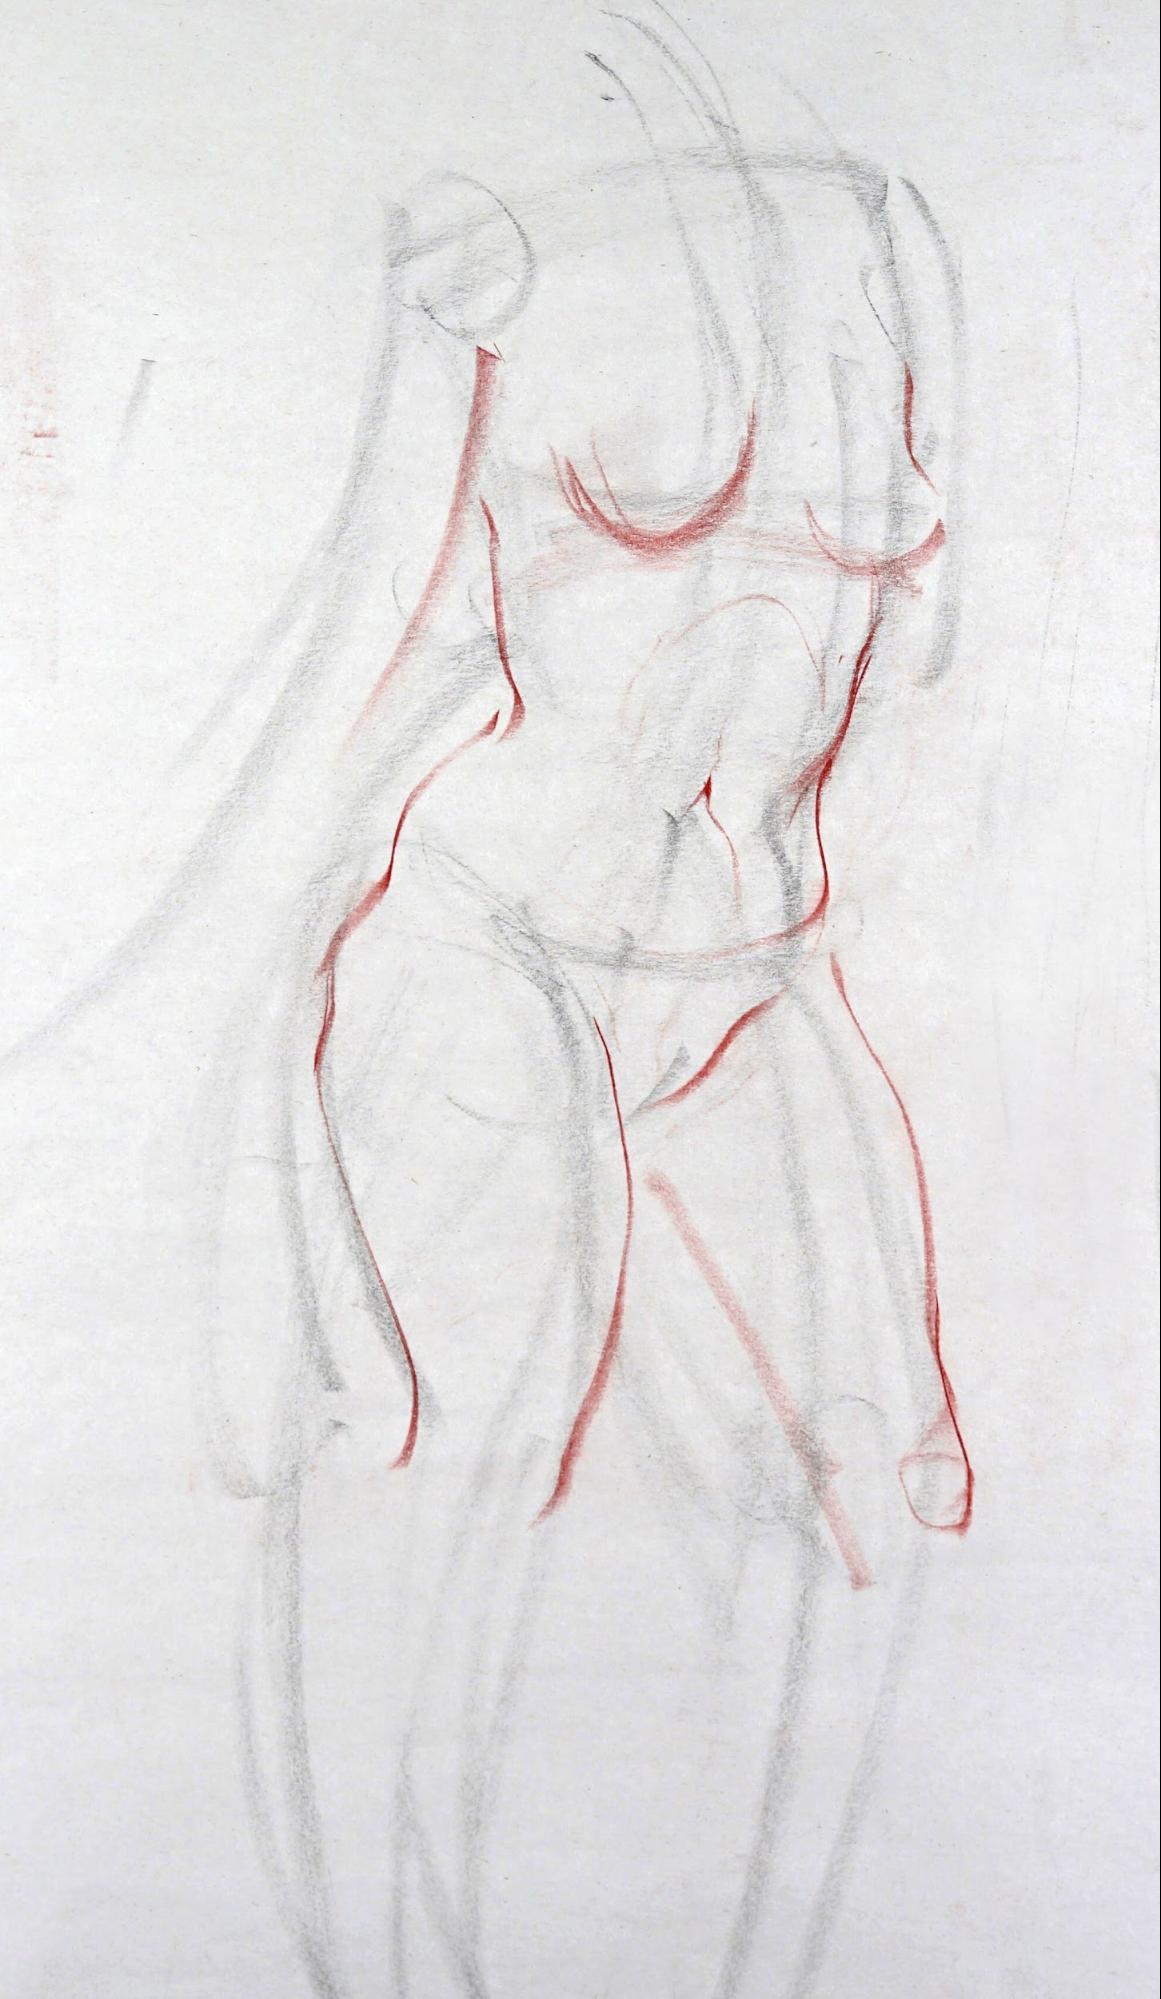
Expanding on the economy concept, I named these categories Penny Lines and Dollar Lines. Penny Lines are so called because they are cheap, disposable lines. You can think of them as the rough draft lines. Drawn very lightly and loosely, they are primarily used in the beginning of a figure drawing for construction.
“What’s the big deal? I use light lines in the beginning anyway,” you might ask. The important thing is to limit the functions to construction, and not description, of specific anatomical data. Clearly defining these functions allows us to know exactly what a line’s purpose is. We can then execute every line with intention, rather than mindlessly going through the motion hoping a body will emerge.
Penny lines are assigned the following functions:
• Initial gesture lines or “action” lines
• Massing simple, general, big shapes (without specific anatomical features)
• Topographical center line
• Cross-contour lines
• Lines that indicate estimated placements of body parts
• Alignments and angles
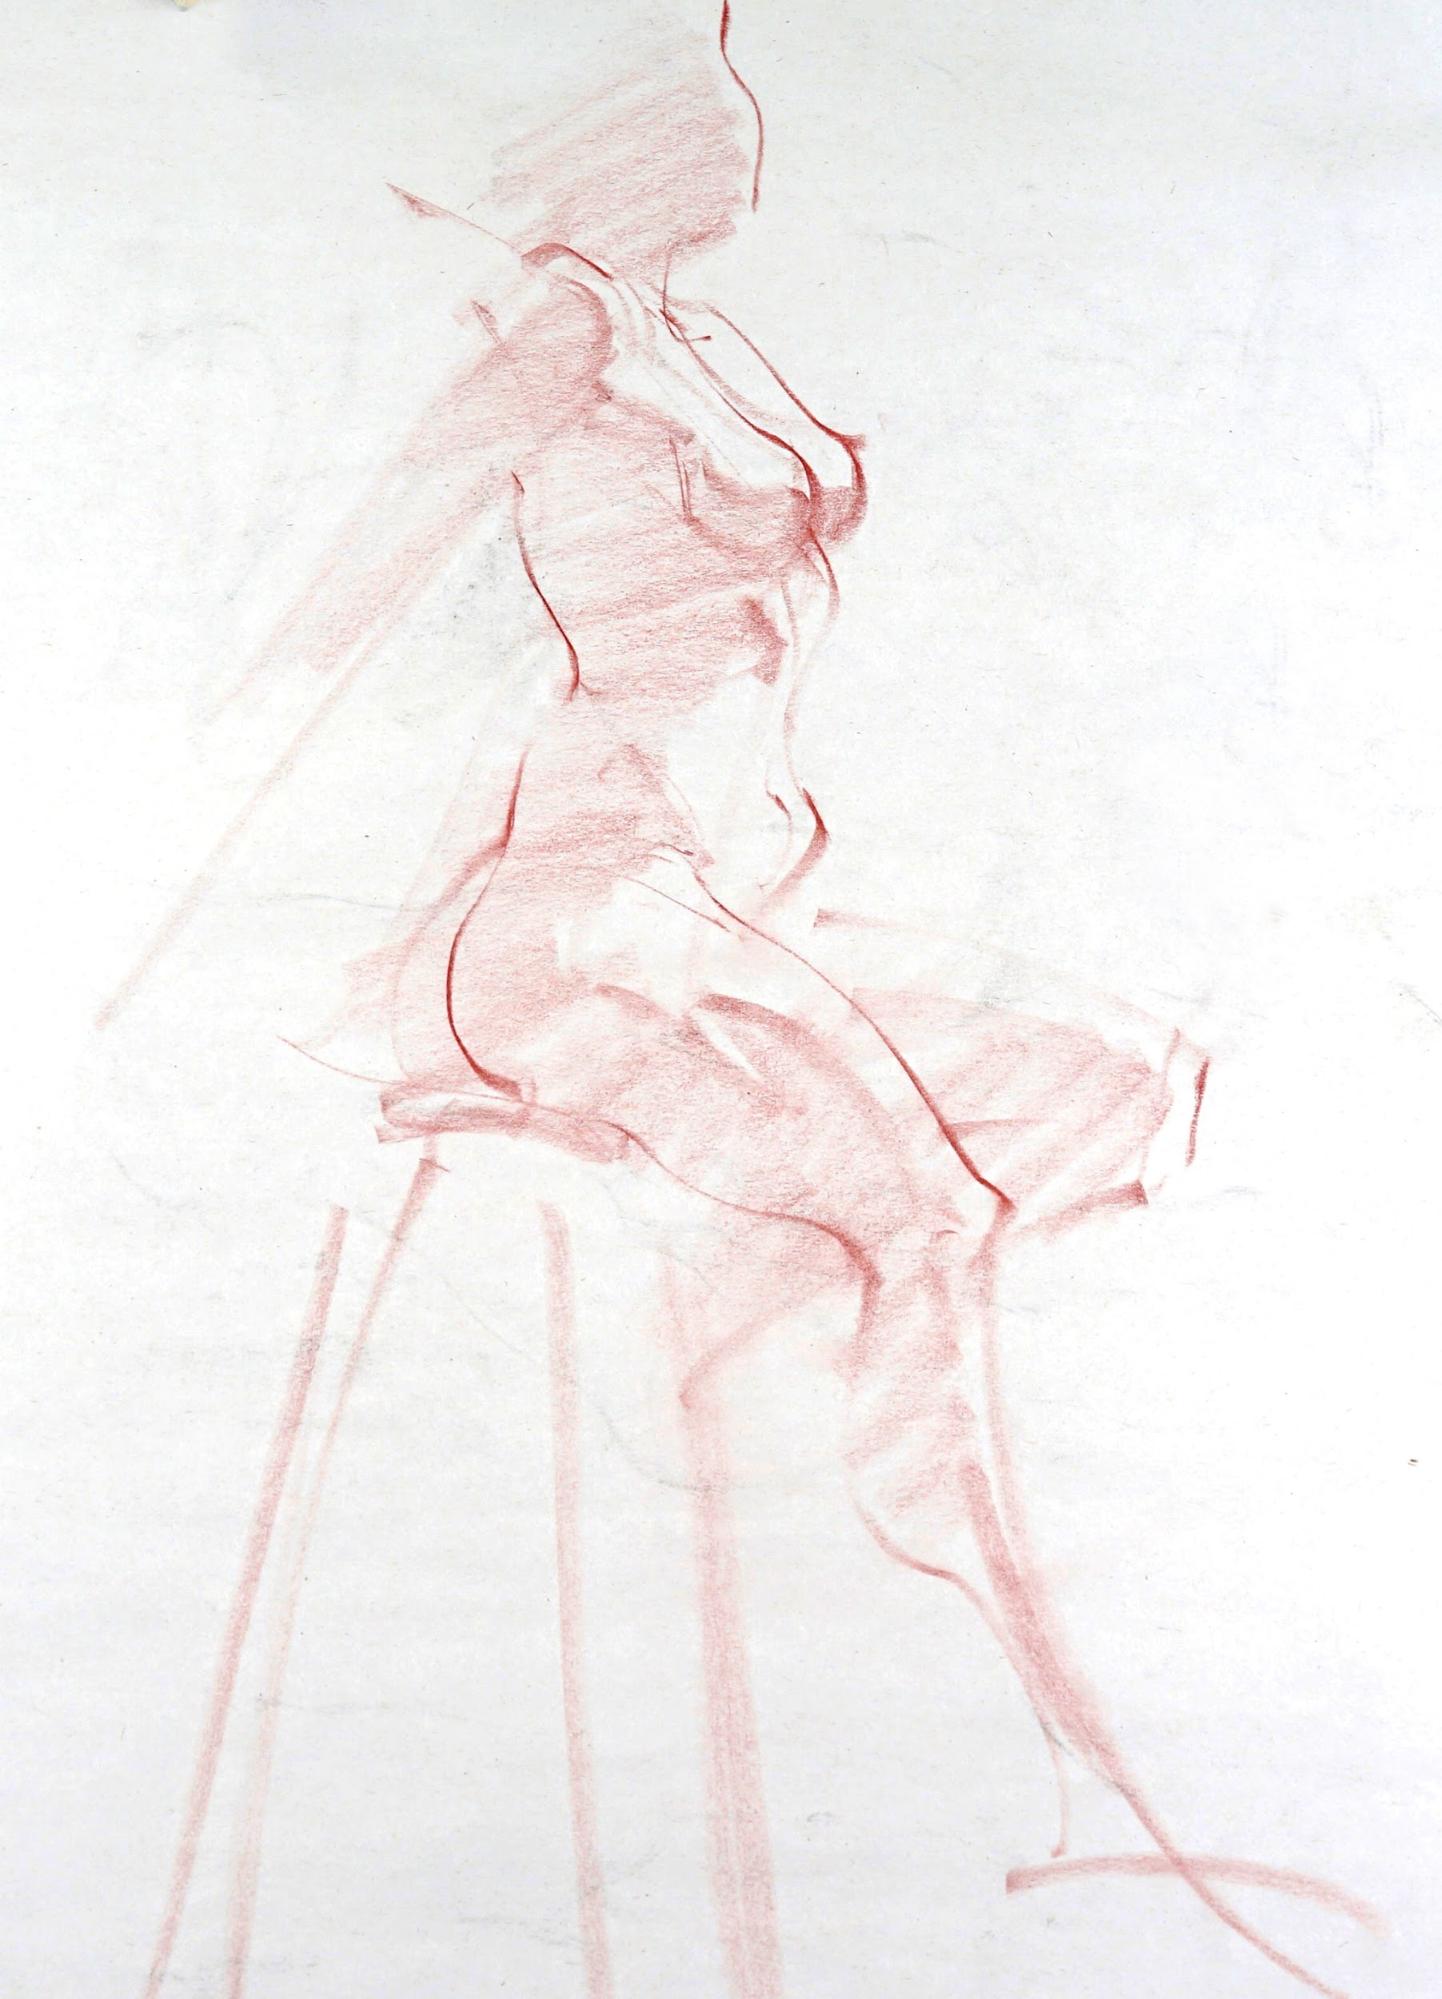
In contrast, Dollar Lines are darker, and drawn with maximum intent. They are the finish lines that define anatomy, outside contour, and other specific information. At a dollar a stroke, they are considerably more expensive than the Penny Lines. Obviously, since we are making an effort not to be wasteful with these lines, we need a degree of precision. The Penny Lines must therefore first establish the general placement of body parts and how they fit together, and the Dollar Lines are then used to define the specifics.
The functions of the Dollar Lines are:
• Outside contour (the outline)
• Prominent anatomical information such as muscles and tendons, joints, and other bony parts
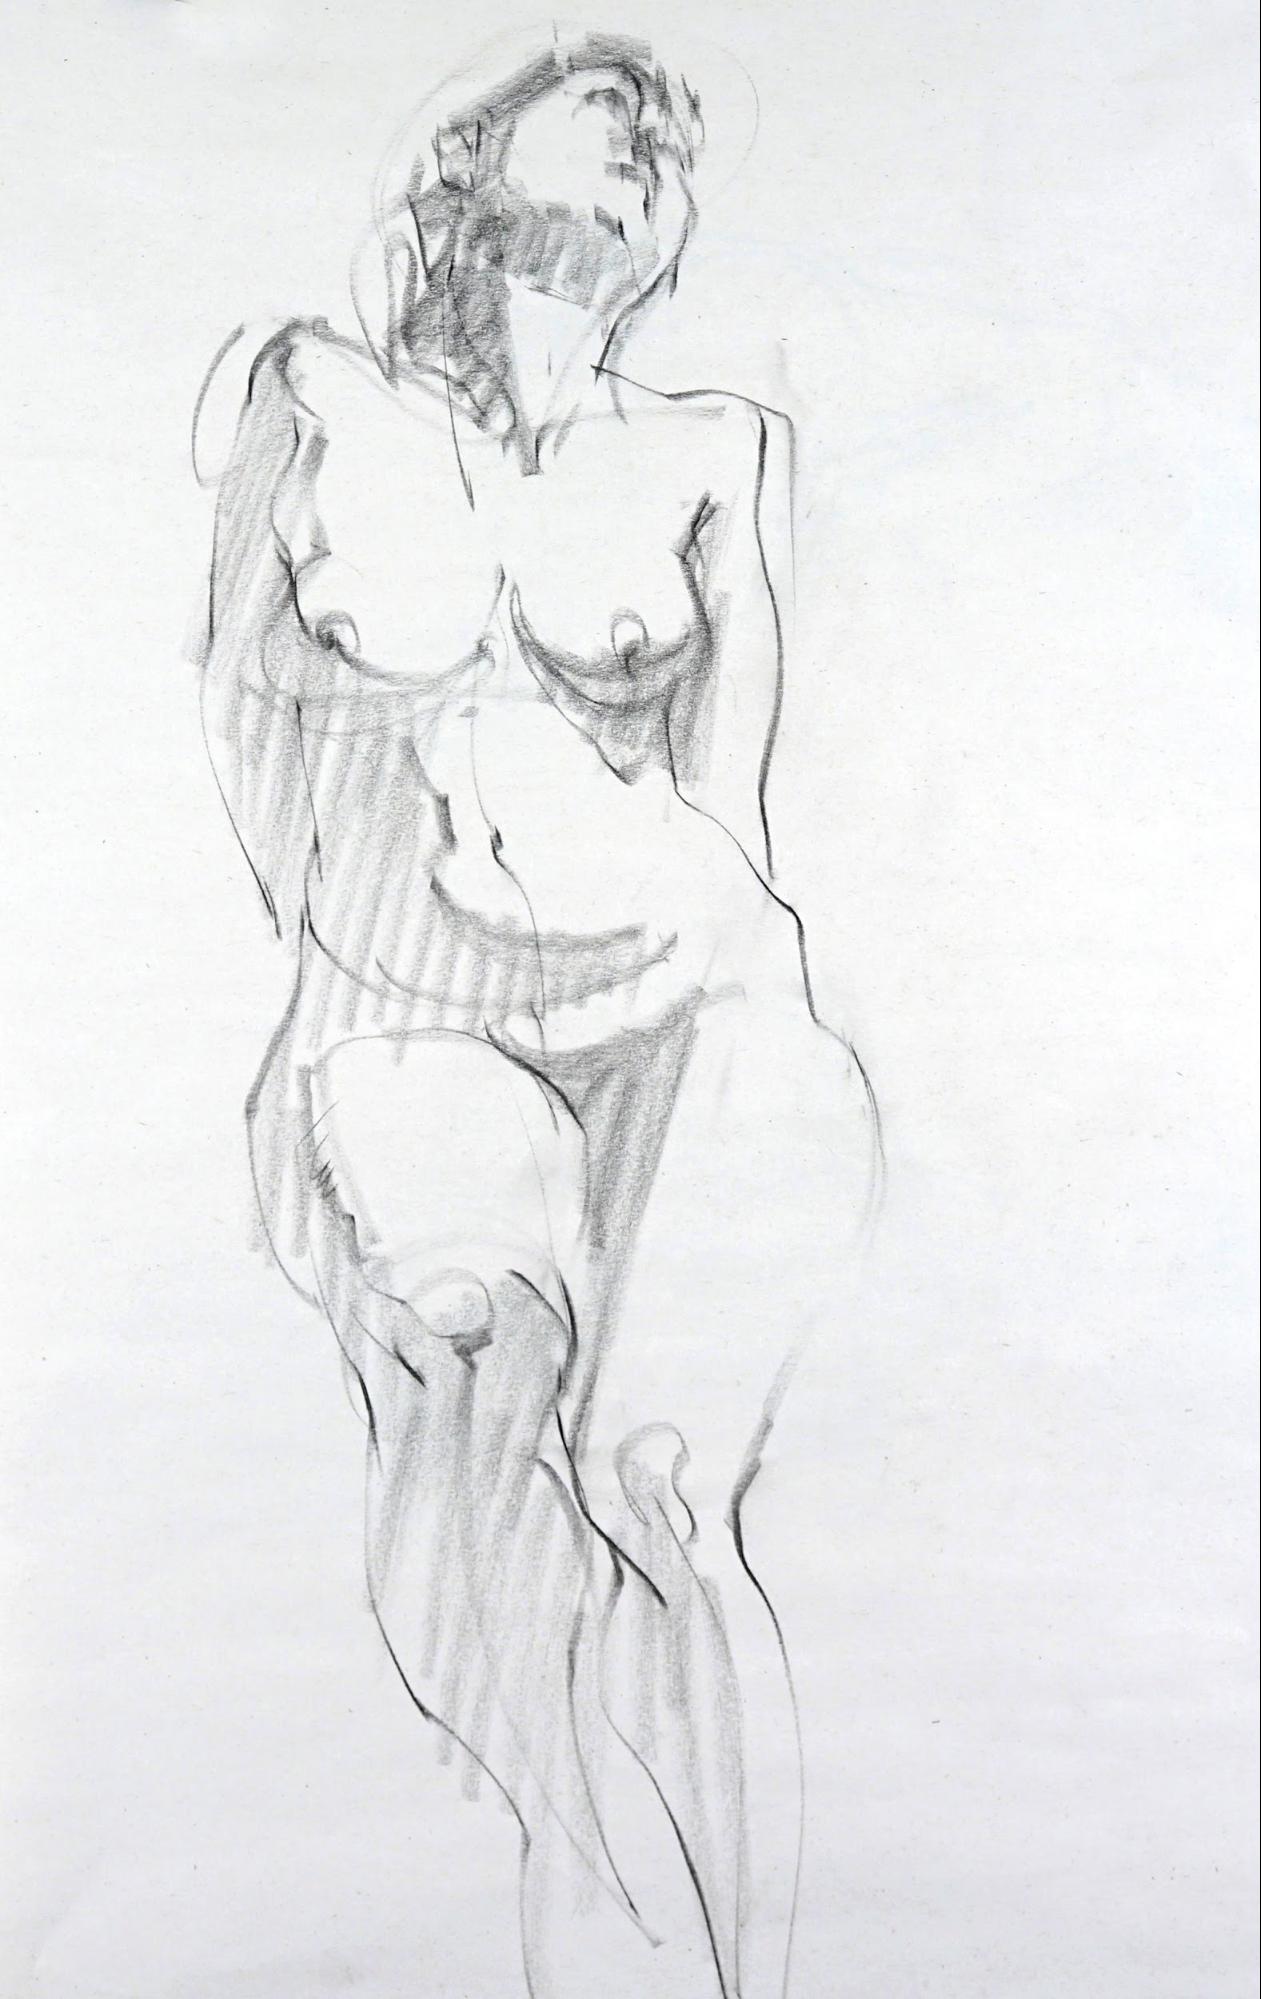
Everything we draw with the dollar line, we commit to. We put it down like we mean it. If we can name the body part (deltoid, Achilles, thumb, etc.), we use the dollar line, and we do it in as few lines as possible because Dollar Lines are not cheap!
Penny Lines are cheap, but the rule is, you cannot use them to define specific, nameable body parts.
Let’s examine the functions a little deeper.
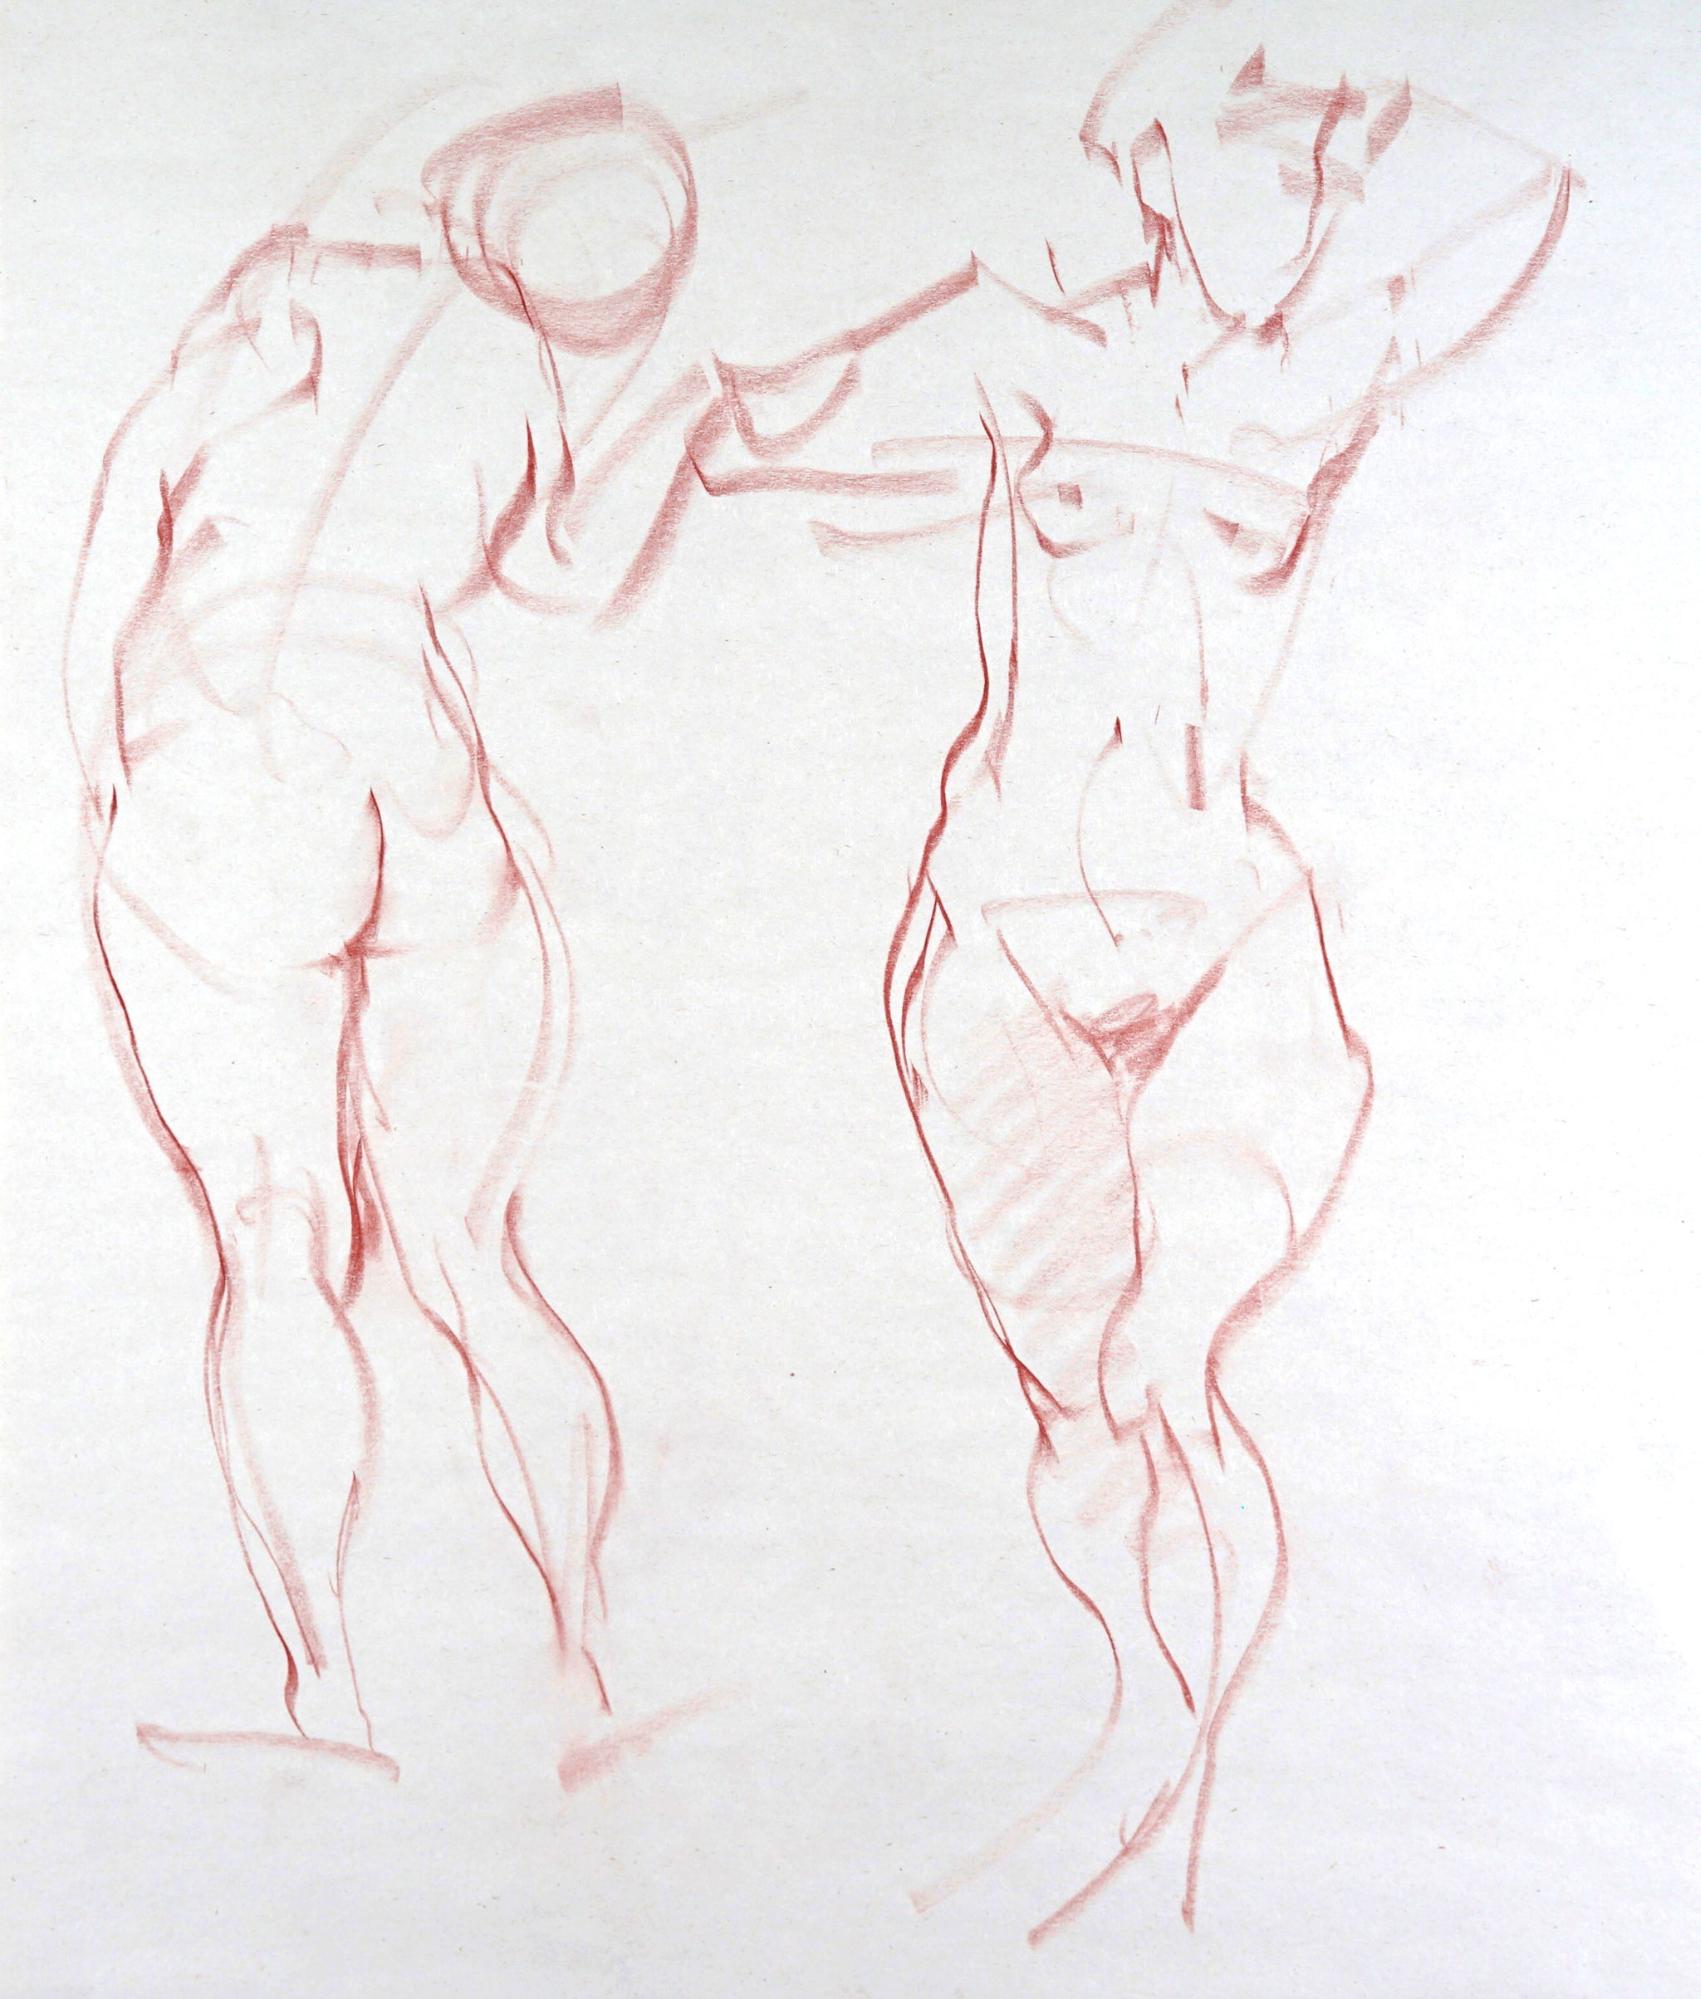
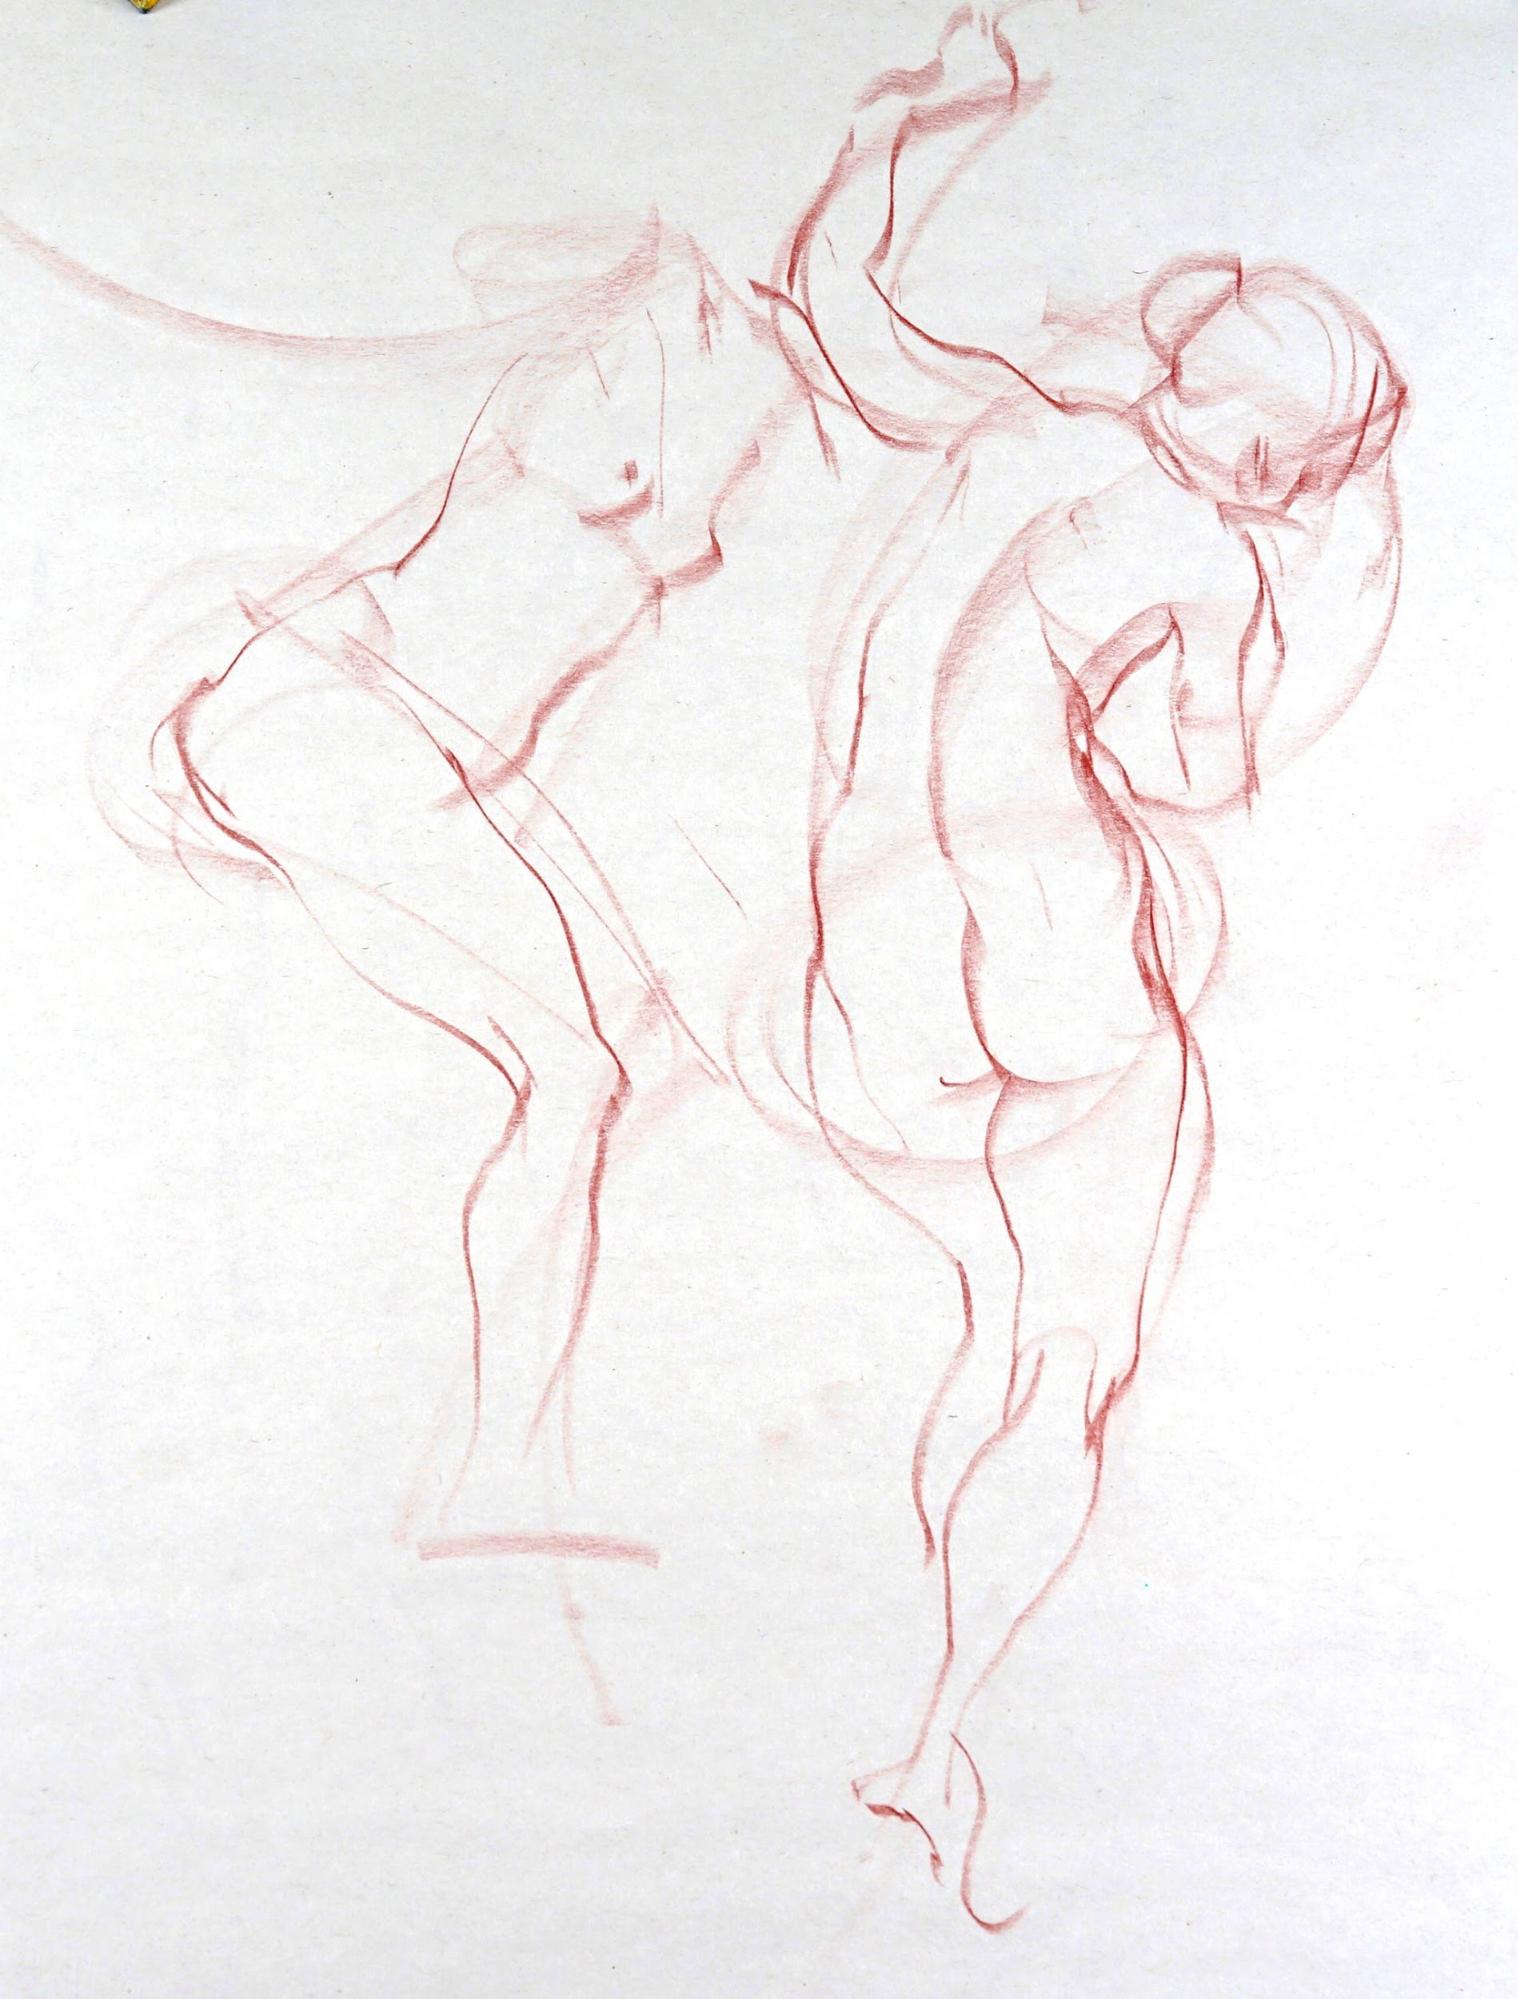
Initial Gesture Lines in a Figure Drawing
Initial gesture lines define the very general, overall action of the pose. You might think of them as describing the flow of the movement. These are usually very simple and fluid. The line may describe the action of the entire figure, or just a part of it, such as the torso, an arm, or a leg. Remember, we don’t define specific muscles or tendons with these lines. Nor do we define the outline of the figure.
Often a student will try to follow the line of the spine, or to locate the very core of the body mass. But that’s missing the point; we are defining the action of the pose, not trying to locate a line in a specific place.
I always think of the analogy of the conductor of an orchestra. If you were to watch him without the sound, you may get a sense of the movement of the music, without hearing the melody at all. With our initial gesture lines, we are trying to capture that sense of movement, without defining anything related to specific anatomy.
Simple Massing
Often the large body parts such as the torso and the legs are first laid in with very simplified, general shape.
It may be helpful to think as a sculptor might — these simple masses are lumps of clay before you start carving out the specific parts. As with sculpture, you can imagine that these lumps of clay are attached to a wire armature, which, not coincidentally, are the initial gesture lines that we’ve already established.
Sometimes, it’s easier to see the torso as a sort of a pickle shape. At other times, it presents itself as made up of two separate lumps of clay, connected at the waist. If the torso is foreshortened, you have to determine whether the upper or the lower lump is closer to the viewer, and make sure the closer one overlaps the farther one.
Topographical Center Line
The lump of clay that represents the to-be-defined torso must be visualized as volume existing in three-dimensional space, not just a flat silhouette. We can do this by drawing the center line.
The center line is not the same thing as the initial gesture line, nor does it go through the core of the torso mass. The center line, as I define it, is the line that runs down the center of the front or the back of the torso on the surface. On the back, it’s the spine. On the front, it’s not physically there but easy to visualize.
This line is important because it gives us topographical information; the rise and fall of the surface as the line travels (on the front) over the rib cage, down to the navel, over the abdomen, and finally down to the crotch.
It also shows us the orientation of the torso — which way it’s facing — and by carefully modulating the distance from the outer edges of the torso as it travels down, we can effectively show the twist of the torso, if it is twisted.
Cross-Contour Lines
Cross-contour lines are those that travel across and around the form, defining the volume of a body part.
Many parts of the body may be described as cylinders, and the cross-contours are like belts on these cylinders. They run perpendicular to the axis of the cylinder. In essence they are ellipses, or circles in perspective, so the depth or the shallowness of these arcs depend on how foreshortened the cylinder is. The more foreshortened the leg, the deeper the arc of the cross-contour line.
I find it very helpful to visualize articles of clothing on the given body part to determine how the cross-contour might look: the hem of bicycle shorts across the thigh, the top of a gym sock across the calf, the sleeve of a tight-fitting T-shirt across the upper arm, etc.
Landmarks
These are the estimated placements of key body parts such as elbows, knees, the navel, the feet. They may also be apexes of curves, or distinct corners where two forms come together.
With Penny Lines, we just indicate where they are, but don’t draw the specific shapes of them, or describe it anatomically. Knees and elbows might just be lightly drawn circles at this point, which will be used as guides to draw with more intent with the finish lines — the Dollar Lines.
The estimated placements might be done by measuring lengths using a pencil, or they may be eyeballed. It depends on the pose and how much time we have on a given pose. Obviously, on a one-minute quick gesture, we don’t have time to measure every little placement.
Alignments and Angles
Another very useful method of placing body parts accurately is to use alignments and angles. By relating one body part to another, already established part, we can construct convincing spatial relationships on paper.
Accurate angles are easy to determine; just hold up the pencil at an arm’s length, line it up with the model’s body part in question, swing the arm over to your figure drawing, and voila! you have an accurate angle. There really is no excuse for not getting angles of straight lines reasonably accurately.
Alignments are basically straight lines between two landmarks, so these too are easy and effective tools to help place body parts convincingly.
The body is basically a symmetrical machine, so you can find corresponding points to align — shoulders, breasts, knees, toes, etc.
Finding alignments doesn’t have to be between two matching pairs of the symmetry. It can be any two points. It is particularly helpful when checking vertical alignments between two points.
If you get all your major alignments right, you don’t really have to worry about proportions.
All of the functions described above are those of the Penny Line. It’s all part of the construction, and thus far, no specific anatomical part is described. But we should now have sufficient information to finish the figure drawing with Dollar Lines. These will be used to describe the outside contour of the body, which means describing muscle shapes, tendons, bony parts, and other specific features.
If you adhered to the functions of the Penny Lines correctly and did not deviate, you should not have any specific outline that you can trace at this point. This means you are using the Penny Line construction elements as guides only. So when it comes to drawing the specific anatomical elements with dark, fully committed, expressive, and hopefully beautiful lines, it may feel like you’re flying without a net. Almost. And I believe this forces you to be more focused, and more intentional with our Dollar Lines.
And we do these in as few strokes as possible, because as I mentioned earlier, Dollar Lines are expensive and we don’t want to waste them. This way of thinking forces us to focus on every line. Imagine, if you actually had to pay for every line you drew?! You wouldn’t be so careless, would you?
If you were in my class, you may hear me saying things like, “What can I get for that dollar?” or “Make every dollar count!” or “Did you just try to get your deltoid for pennies?” The analogies become pretty vivid and colorful. And often humorous, which helps students remember the lessons.
If you make a mistake? Just ignore that line and draw a better one. You can do more than one line if you have to, but each time, it should be drawn like it’s the last attempt; your last dollar.
Most of the time, these gesture drawings are just studies, much like a musician practicing scales. We are not looking for masterpieces, so relax and try not to feel too attached to any one drawing, or any one part of a drawing. That’ll just paralyze you and take all the life (and fun) out of the figure drawing.
Still, if we have time to refine the figure drawing, we should. Here are a few tips:
Think about a dominant focal area, and emphasize it. Don’t bring every part to the same level of emphasis or finish. Having a hierarchy of importance makes for a much more impactful drawing.
You might vary your Dollar Lines in strength to achieve this hierarchy of importance and find more expression in your line work. Instead of all the finish lines being a dollar, some may be seventy-five cents and some may be a dollar and a quarter. Where on the drawing would you put that exclamation point? Where would you play it fortissimo? And where would you whisper softly?
Often (but not always), the joint areas are more emphasized than the muscle forms between them. Try to vary the line strength and see how different your drawing looks.
In the end, what we want to communicate is intent.
Every single line should look intentional.
Every point of emphasis should look intentional.
Every subtle line should look intentionally subtle.
Make every line look like you meant it, and even your mistakes will look intentional and convincing!

ABOUT THE ARTIST 
Terry Miura graduated from Art Center College of Design in 1990. He paid his dues in New York City, working as a freelance illustrator for such clients as Time, Newsweek, Rolling Stone and Sports Illustrated. He returned to California in 1996, and began a 10-year transition into becoming a full-time painter.
His evocative and atmospheric landscapes, cityscapes and figurative works are widely collected, including pieces in permanent collections in the California Museum of Fine Art, the Crocker Art Museum, and the Smithsonian Institute.
Connect with Terry Miura:
Website | Instagram
Related Article > Drawing the Figure: Heads, Hands, and Feet by Juliette Aristides
Visit EricRhoads.com (Publisher of Realism Today) to learn about opportunities for artists and art collectors, including: Art Retreats – International Art Trips – Art Conventions – Art Workshops (in person and online, including Realism Live) – And More!


”")