


Oil Painting Techniques: How to Prep Your Own Oils, Step by Step
BY PATRICK MCGRATH
For years I’ve used various oil paint brands, from the cheapest student grade to the expensive premium ones. In the process I’ve found that the artist-grade oil colors are the ones that work best for me, but even better yet is to make my own paints. Back in art school I remember creating my own pastels, crayons and encaustic using pigments and binder. You would be surprised at how incredibly easy and cheap in the long run it is to create your own oil colors.
Many paint brands use little pigment combined with more oil, fillers and cheap additives to sell us student-grade, low-quality paints for a very economical price. I’ve even found more expensive oil brands that do the same thing. The result is that you end up using a lot of oily or waxy paint to cover an area or use a lot of paint to mix with another color just to see this paint disappear and be totally absorbed by the other color. No wonder so many of us were so frustrated and discouraged from our first oil painting classes. It’s quite easy to tell when a painting is done with low quality paint with poor ingredients.
Once you spend some more money on high-quality materials or take the time to make your own paints, things do change dramatically. By making your own paints, not only do you save money, but you also gain full control over the ingredients and quality of the paint. I recommend anyone that is seriously interested in oil painting to take their time and give this approach a chance. You’ll soon see it is really worth it.
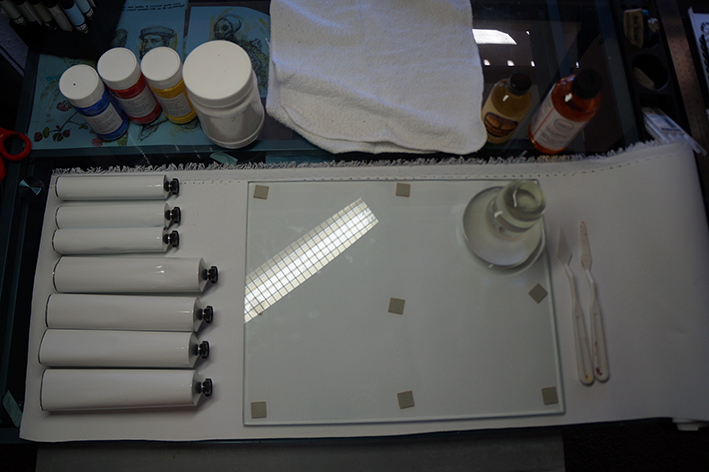
Here’s what you will need:
• A few empty oil tubes.
• A glass muller and glass slab. (The glass muller may seem a little expensive, but believe me, it’s worth every penny. Natural Earth Paint on Etsy has good affordable ones.)
• Pure Titanium White Pigment or any other pigment
• Palette Knife (metal ones are better than plastic but plastic would be ok)
• Cold pressed Linseed Oil, Alkali refined Linseed Oil or Walnut Oil (depending on the kind of pigment you are using).
• Wax medium (optional).
• Rags or Paper towel to clean up.
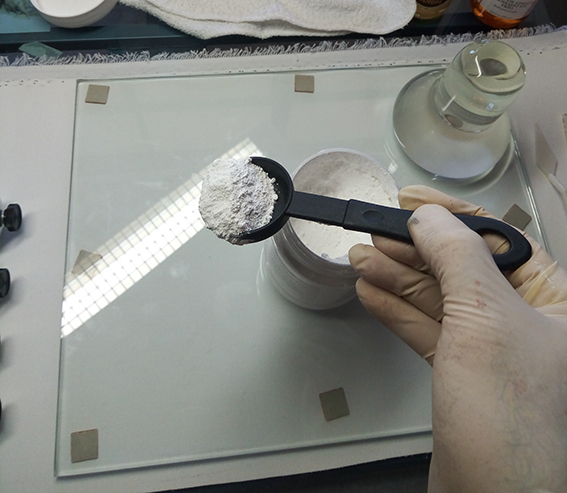
• Measuring spoon.
• Latex gloves, dust mask and a clean, well ventilated place to work. (Also an extractor or air purifier is really worth having, especially if you live in an apartment.)
Step 1:
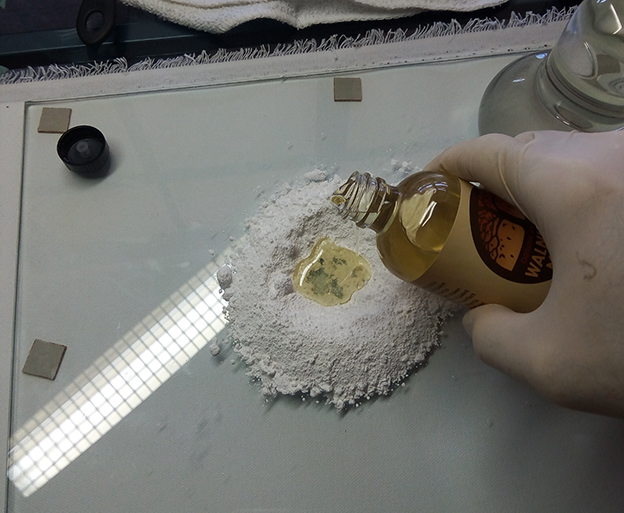
Place the pigment in a pile in the middle of the slab.
Step 2:
Create a well in the middle of the pile of pigment forming a little volcano.
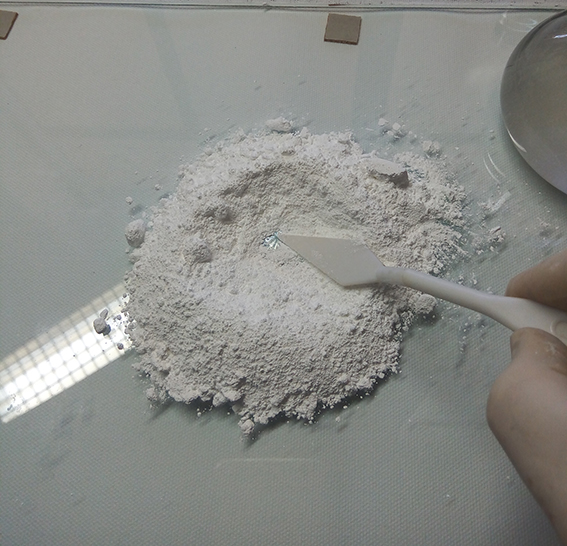
Step 3:
Pour some oil in the well of the pigment. In the case of white pigments such as Titanium White I prefer using Walnut Oil as it is less yellowing than linseed oil. Poppy oil is a great option as well.
Step 4:
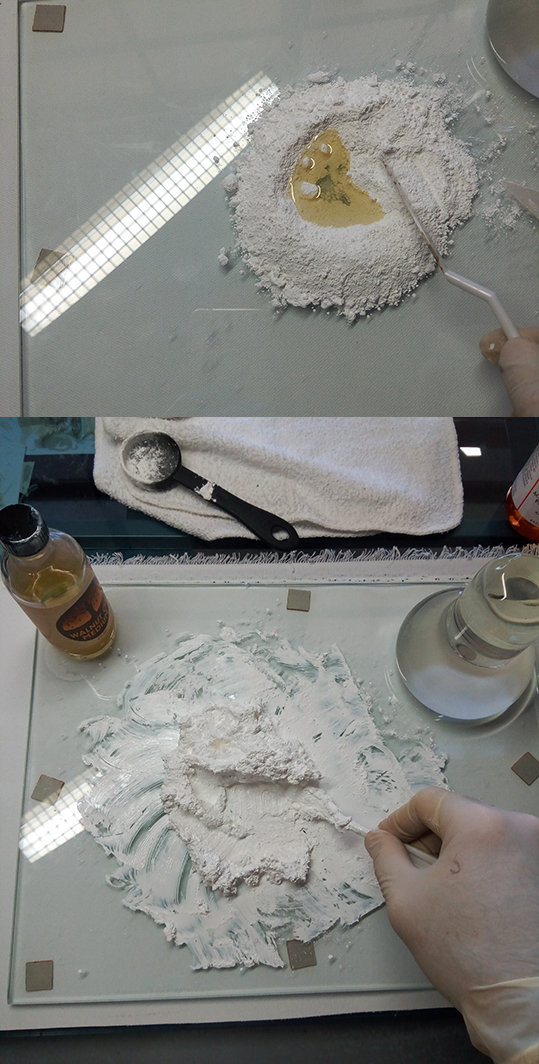
Very carefully cover the oil with pigment using a palette knife. Mix Oil with pigment, adding more oil as needed until you end up with a very thick paste. Optional: At this time I sometimes add a little wax medium to increase body and oil absorption of paint.
Step 5:
Grind pigment with the glass muller using some pressure in smooth circular motions until you get a buttery consistency out of the stiff paste. Make sure paint is made into a thick buttery paste. If it’s too oily, add more pigment. Oily paints can result in yellowing and wrinkling of the paint film.

Step 6:
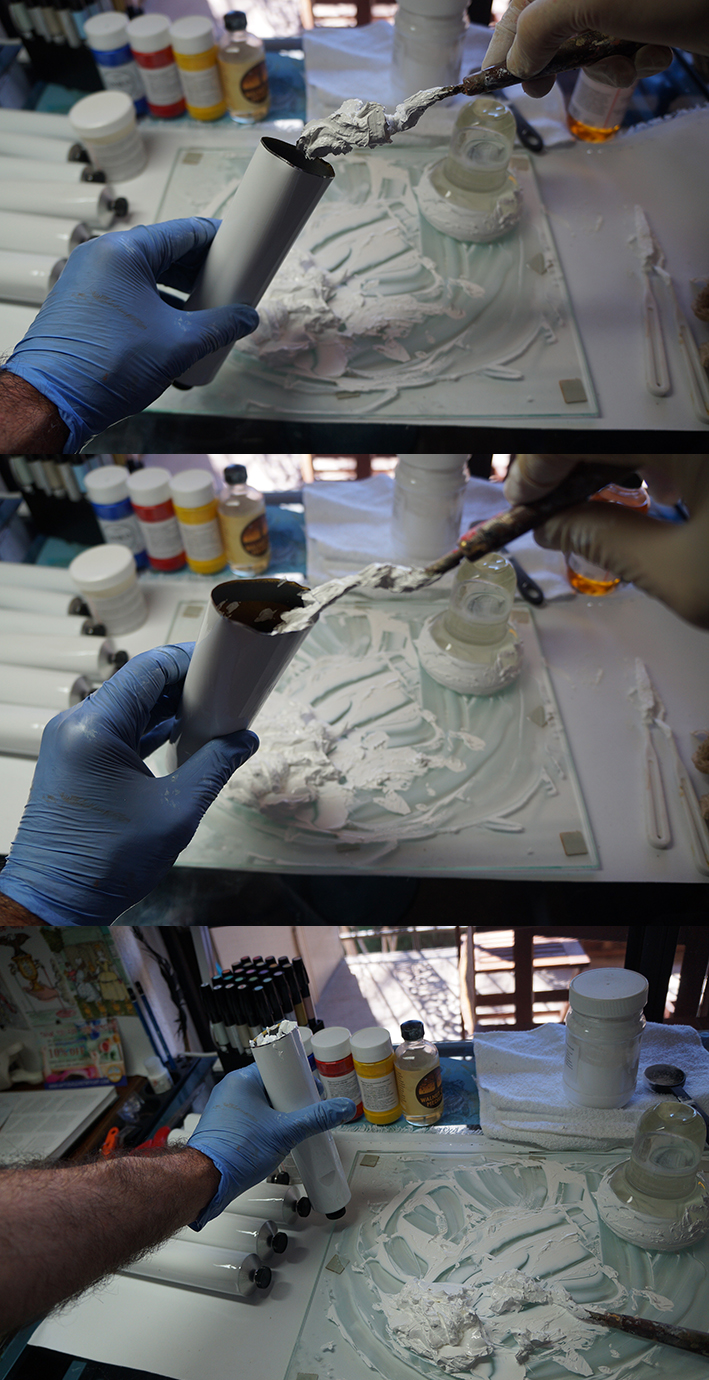
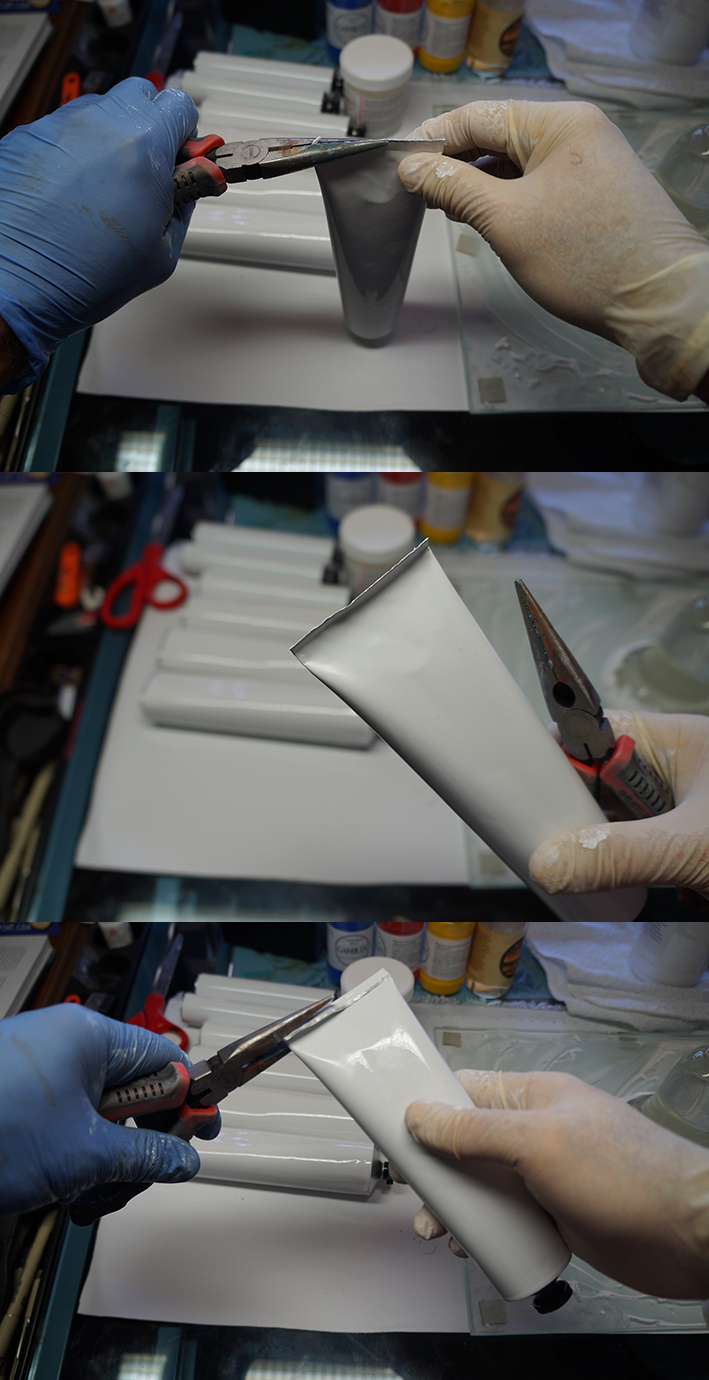
Once paint is fully ground with no lumps and free from grittiness, you can start putting it into an empty oil tube using a palette knife. Hold empty tube upright and fill the open end with paint. Tap the oil tube a few times on the table so paint settles to the bottom and disperses any air bubbles. Scrape off inner edges of the oil tube so there is no excess of paint where you’ll close the tube. Paint should fill up tube to within one inch of the open end.
Step 7:
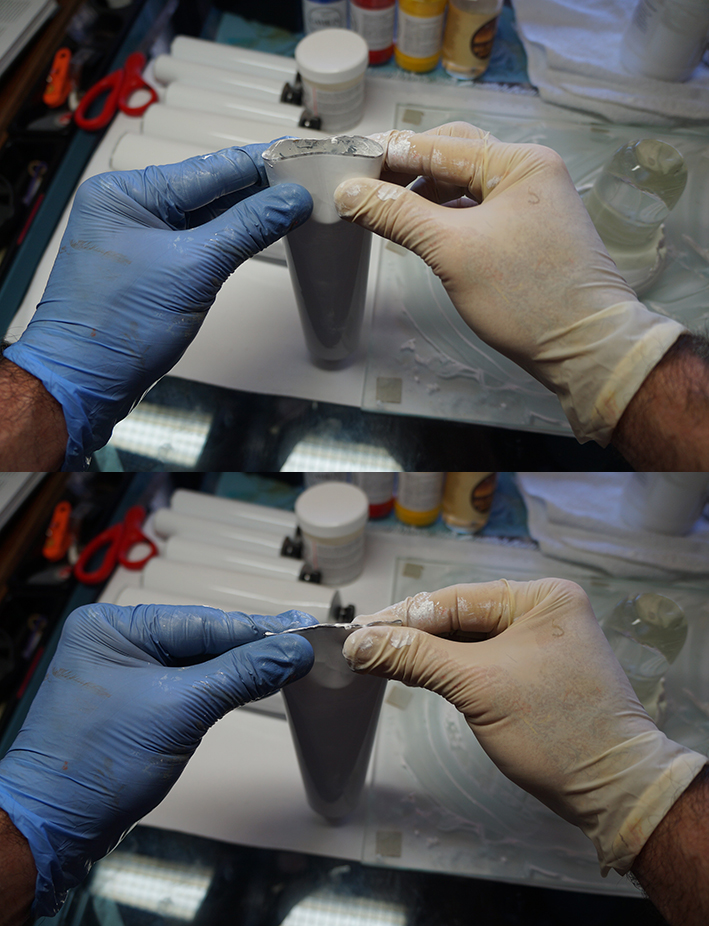
Pinch and close the tube by gently squeezing the ends and expelling any air. Use pliers to fold and tightly close tube. Fold and close at least twice.
Step 8:
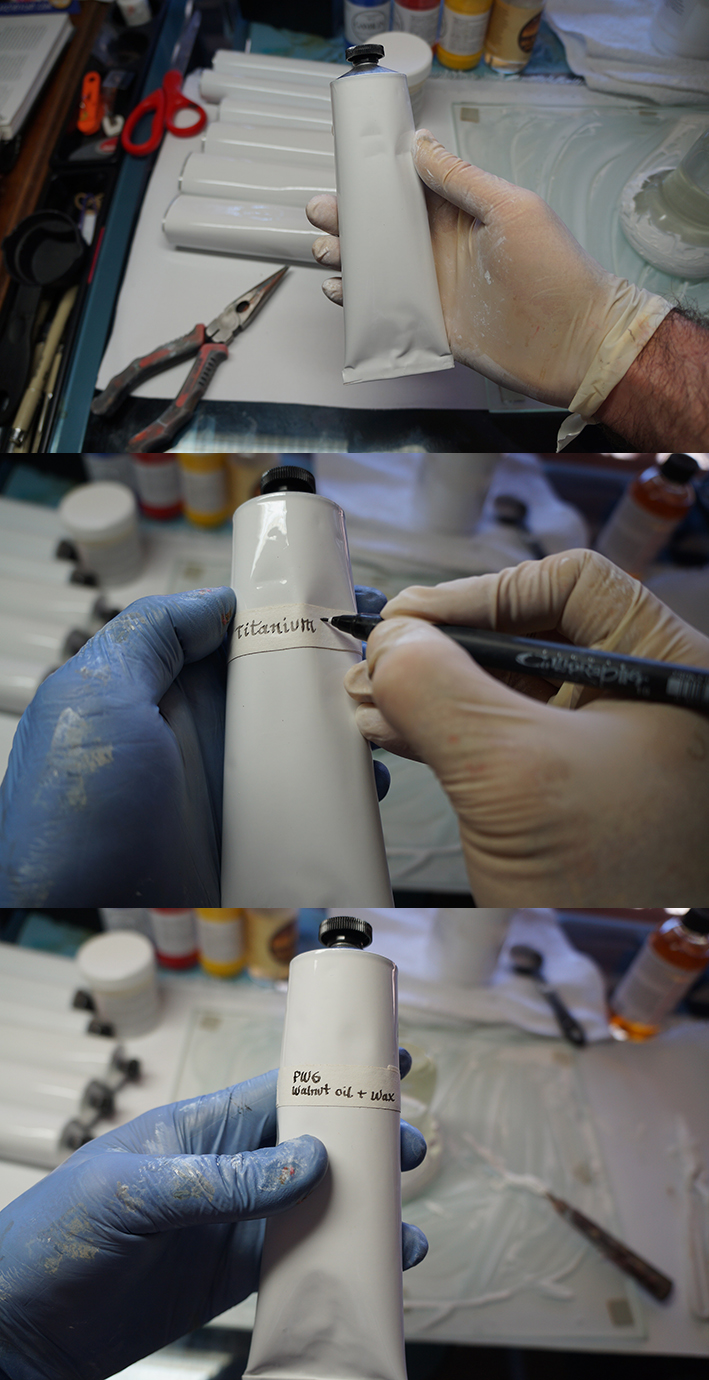
Once tightly closed, we can now wipe any paint off the tube and label your freshly made paint with tape and a marker or Sharpie. When using more than one pigment, make sure you identify them all in your label so you can remember how you created that particular color.
Oil Painting Techniques and Making Your Own Oil Paints: Final Tips
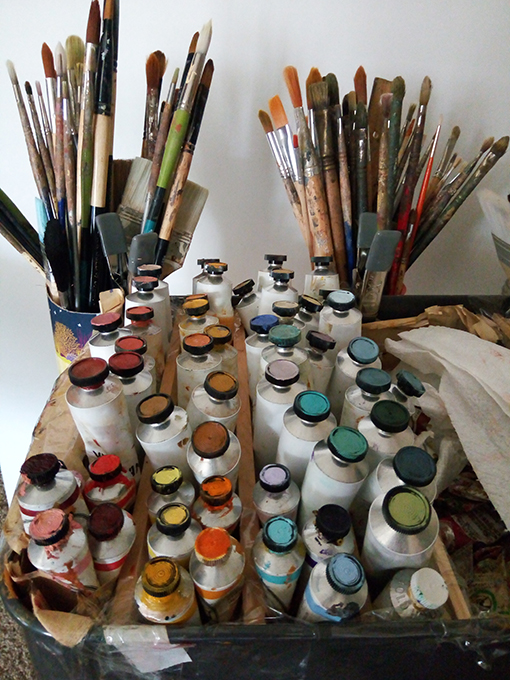
For easier identification I usually paint the cap of the oil tube with the remaining pigment. I then organize them heads-up in my paint bin according to hue or value, as I keep mixing and making most of the colors I’ll use in my work. I prefer to store oil paints in tubes rather than in cans or other receptacles. Well-capped oil paints in tubes last longer.
I always try to keep extra empty oil tubes around in case I wish to create a new color from leftover paint on my palette. These are relatively inexpensive and you don’t necessarily need to create a new color from scratch using pure pigments, but you can instead use readymade oil colors and mix them together to create a new color and store in the tube.
Preserving as many of these ready-to-use colors in tubes may not only save you a lot of time mixing new colors on a palette but also allow you to personalize your own color choices.
ABOUT PATRICK MCGRATH
Patrick McGrath Muñiz is an artist from Puerto Rico who currently exhibits his work across the U.S. and abroad while residing and working in Houston, Texas. He obtained a Bachelor’s Degree (Magna Cum Laude) in Fine Arts from the School of Fine Arts of San Juan, Puerto Rico in 2003 and a Master’s Degree (Summa Cum Laude) from the Savannah College of Art and Design in 2006.
His work consists primarily of oil paintings on canvas and retablos inspired by Latin American colonial paintings addressing current issues such as Neo-colonialism, the mass media and consumerism. Patrick’s work can be found at the Albuquerque Museum, in New Mexico, the Mesa Contemporary Art Museum in Mesa, Arizona, the Savannah College of Art and Design in Savannah, Georgia, as well as a number of private collections in the United States, Europe, the Caribbean and Latin America.
Website: http://www.patrickmcgrath-art.com/
Visit EricRhoads.com (Publisher of Realism Today) to learn about opportunities for artists and art collectors, including: Art Retreats – International Art Trips – Art Conventions – Art Workshops (in person and online) – And More!


”")